Heya !
Here is a new version of the RLV with a few bug fixes (including one to a recently introduced bug that was really annoying, making some attachments not rez upon login when lagging a bit), and a feature I took directly from Kokua and Firestorm : the ability to rez an object or several objects to their last position !
- added : "Restore to Last Position" menu item on objects in inventory. Taken from Kokua. Attention, there is no check for the simulator name, rezzing permissions or anything (except the @rez restriction of course). Use with caution, as it could rez your object at a place that might be out of sight and you will believe it is lost !
- fixed : Some attachments could be missing when logging on, or after a TP under laggy conditions, regardless whether they are RLV-locked or not. This bug appeared in 2.9.14 and is probably in the official SL viewer as well.
- fixed : Friendship requests text messages could go through a @sendim restriction (but not through a @recvim one).
- fixed : RenderDeferredShowInvisiPrims debug setting did not work well after a relog (the viewer thought it was TRUE even when set to FALSE, and it had to be set to FALSE manually again). Thank you Aria Warden for the heads-up !
- fixed : Crash when editing a prim inside an object whilke under @shownames. Thank you Angelina Sinclair for the report !
- fixed : We were able to join a new group and be set to that group even under @setgroup. Thank you Vanilla Meili for the heads-up !
You can grab the RLV for Windows here :
www.erestraints.com/realrestraint
Direct download :
www.erestraints.com/realrestraint/RestrainedLoveSetup.exe
And the MD5 hash for the executable is :
aeb2453d62ac7d18cd05f6e14f04e1d0
Have fun !
Marine
Tuesday, October 27, 2015
Thursday, October 22, 2015
New product : Racing System
Hi there !
After releasing a big update to the existing carts, then releasing the Sulky and the Chariot, then yet another update to the carts, let me introduce you to the very reason I did all that in the first place : the new Racing System from Marine's Goodies !

A racing system for pony carts, to be exact, but technically it works for cars, planes, whatever you can think of. Even for people on foot. Even bound people.
I've always thought that cart races were an activity that was missing in ponyplay in SL. We have steeple courses, dressage, cart driving, polo, slalom and a number of other activities, but not really racing. Well now, here it is !
This racing system is fairly simple to set up and is very versatile, as it can handle all kinds of races you can imagine :
- Pony cart races (with Marine's Goodies carts you can even have them slow down or boost up when driving over special surfaces, see below)
- Standard vehicle races (land, air, water)
- Steeple courses (ponies jumping over hurdles and avoiding bumping against them)
- Simple races on foot, or even flying (it's SL after all)
- Races between bound submissives (it's fun to see them hop or even crawl hogtied, to reward the winner and punish the losers !)
All those races can be either closed (the start and finish lines are the same object) or open (both lines are different objects and you simply race from point A to point B).
More over, you can create your own sub-tracks (that is, telling the Racing System to use only a portion of your track instead of all of it), like they do in real life motorsports, and have obstacles show and hide themselves to indicate the way to go.
The box includes the Racing System itself, as well as 4 sample (but fully functional) tracks to both serve as ready-to-use tracks and as examples to help you build your own. It also contains pieces to build your own tracks, as well as textures and helpers. It's a full system that is designed to be both very easy to set up and use, and very powerful and versatile !
I want to emphasize that the Racing System works even if you do not use any of the provided sample tracks. It just didn't feel right to sell a product with nothing to show and that wouldn't work out of the box (since it would have required you to build your own track after buying the system). At least, with these sample tracks, you can play right away. But you do not have to use them. If you own a parcel or a sim with already existing roads, nothing keeps you from rezzing a Race Controller, some lights and score boards, and start racing on them !
Quick start
Let's not get technical just yet. You have your Racing System and you want to use it, but you don't have a whole afternoon to build your own track so you want one to work out of the box.
That's easy. Rez one of the 4 sample tracks, knowing how much Land Impact you can afford. When you rez one of those tracks, all you see is a black and green cube that takes only 1 prim :

Click on it and choose "Rez". This system works exactly like the trusty old Rez-Faux, so there is no surprise there (this one is called BuildBox and is available for free on the Marketplace). Wait until all the pieces have been set in place, move and rotate the box around if you need to place the track correctly. Once done, click again, choose "Finish". This will remove all the rezzer's slave scripts from the pieces and the track will be ready as if you had rezzed it by hand yourself. You can then delete the box as you won't need it anymore.
Each track has a different Land Impact and serves a different purpose, but all are meant to serve as an inspiration when you feel ready to build your own tracks yourself. They are not just examples though, they are all readily usable and challenging ! Each one is named in a way that you know what to expect in terms of footprint (for example "64x32m", the first number meaning the front size when you look in the same direction as the rezzer, the second one meaning the depth) and of Land Impact (the number of "prims" it takes once rezzed on your parcel, not counting the rezzer itself) :
- Willow Woods is a very small track meant to demonstrate how to make a steeple course with this system, but also how to build a very basic track with 3 checkpoints and a couple turns. It takes 24 prims when rezzed and has a footprint of 64x32m. It contains two sub-tracks, one named "track" (the outer dirt ring) and the other named "hurdles", the middle field with the steeples. Both sub-tracks have a different start line. If you drive an MG cart (for example the Sulky) over the grass, you will notice that it goes slower than on the dirt track. There are also two fault prims (one per sub-track) to add seconds to your time if you dare driving or running through them. The hurdles take 1 prim each and of course you can reuse them for your own tracks. The texture for the numbers is not included but you can find it here, it is very cheap.

- Glenfiddle is a small Go-Kart track with tight corners and short straight lines. It has a footprint of 32x64m and takes 55 prims. It does not have any sub-tracks and is the simplest track of all. It is quite tricky though, as the road is narrow and most of the turns are sharp.


- Chatterley is a bigger Go-Kart track with 3 sub-tracks (short, medium and long). Each sub-track makes some obstacles show or hide themselves, letting you see how to manage obstacles for your own tracks. It takes 89 prims over a footprint of 68x44m.


- Farside is the biggest track of all, as well as the most complete one. It even has sponsors ! It is a full-featured race track with special surfaces (curbs, grass and gravel) that will slow an MG cart down, an overpass and obstacles that show and hide themselves according to the chosen sub-track. It even has a straight run with a finish line that is away from the start line. It features 6 sub-tracks (straight, sprint, fast, short, medium and long), each one having obstacles showing and hiding to indicate where to go. And those obstacles are solid, if you rub against them in an MG cart you will slow down significantly. If you want to build your own track, I recommend using Farside as an example. It has a footprint of 128x64m and takes 179 prims.


Getting the Racing System ready
Once you have rezzed the track you want, all you have to do is rez your Race Controller somewhere near the start line :

Click on "Maintenance", then "Channel" then select the number corresponding to the track you've rezzed. Glenfiddle is 1, Chatterley is 2, Farside is 3 and Willow Woods is 4. If everything works fine, you should see the track react and some of the components show themselves for a bit.
That's it ! You can already start racing now.
Some tracks have several available sub-tracks to allow you to race over only portions of them. Willow Woods has two ("hurdles" and "track"), Chatterley has three ("short", "medium" and "long) and Farside has six ("straight", "sprint", "fast", "short", "medium" and "long"). To select a sub-track, simply click on the "Sub-track" button on the Race Controller and select the one you want. You will see all the obstacles and checkpoints flash for a short while to show you what is concerned by this sub-track.
There are two big types of races : on foot and in a vehicle (like a cart).
If you are on foot, you need to register yourself into the Race Controller first, by clicking on "Enter Race", then by entering the name of your team (or your color, or whatever you want, even nothing at all) then pressing "Submit".


Then you click on "Start" and go when the go is given.

If you are in a vehicle, there can be two possibilities :
- If you are the driver in an MG cart (Sulky, Dogcart, Chariot, Phaeton), then you will be registered automatically as soon as you sit in the driver's seat, provided that cart is v1100 at least. And if you stand up or log out, you are removed from the race automatically as well.
- If you are driving another type of vehicle (from another brand for example), then you need to wear the Driver Token (included in the box, it looks like a small wheel icon once worn) and to be an RLV user (*). If you wear the token before sitting in the vehicle, click on its wheel icon after sitting, click again when you stand up later. If you wear it after sitting, no need to click. Likewise, if you forget to click and register yourself, the Race Controller interrogates all the Driver Tokens around to give them a last chance to register when the race starts. The Driver Token is full perms so you can pass it around to the other racers.

In case you wish to emulate the MG carts' behavior in vehicles of other brands that you can modify, the box contains a copy of the "DriverSeat" script that is contained in the driver seat of every MG cart v1100 and above. Simply drop this script in the prim that serves as the driver's seat of your vehicle, and that's it, you won't have to wear and use a Driver Token for this vehicle anymore, nor will you need the RLV for it to work.
(*) This is for technical reasons : when you cross a checkpoint or whatever other component of the Racing System (obstacle, fault), it needs to know who drives the vehicle that was detected, but the vehicle is not designed to respond to such a question from the component, since it is scripted by someone else. So you need to wear an attachment (the Driver Token) that will tell that component that you are the one driving this vehicle, and for this it the token needs the RLV since normal scripting doesn't provide this capability (there is no "llWhatAmISittingOn()" LSL function or whatever it would be called), while the RLV API does have such a command ("@getsitid" if you want to know everything).
A race can be in any one of these three states :
- Ready : The racers are registering themselves, the number of laps is chosen, the sub-track is selected, etc. This is the basic state. Pressing Start will switch to the "Running" state.
- Running : Someone has pressed the Start button and the racers are running and timed. Pressing Stop or finishing the race will switch the state to "Finished".
- Finished : All the racers have completed their final lap or abandoned (they are then marked "DNF", meaning "Did Not Finish"), or the Stop button has been pressed before everyone could finish. Pressing the yellow Reset button (not to be mistaken with the "Reset" button in the Maintenance menu) will switch the race back to the "Ready" state.
Channel
There is a concept you will see a lot with the Racing System : the "channel". What does it mean ?
A Race Controller controls all the components in the sim owned by the same owner (you), but suppose you own several tracks in the same sim, then how to avoid one Race Controller from controlling the components of another one ? Simply by setting it to a different channel.
The channel is simply a positive number that is common to all the components connected to one Race Controller, but different from all the others. Think of it as a radio channel, every radio set to the same channel will be able to communicate with each other, but no other radio transmitter will.

By default the channel is 10 but feel free to change it to another positive number (1 and higher). In fact, you should change to another number when you are done building your track.
When you rez your Race Controller, it resets itself and starts its listener on channel 10 (unless you have changed its Description field to another number before rezzing or resetting it). When you rez other components (Checkpoints for instance, but also start lights, score boards and such), they will also reset themselves and start their listeners on channel 10 (once again, unless their Description field has been changed prior to rezzing or resetting them). This guarantees that they will be connected to the Race Controller right from the start, by clicking on the Maintenance button on the Race Controller, then pressing "Detect compo." :


Most components set to channel 10 (which, I repeat, is the default, and will need to be changed to another number later) will react one way or another.
If you press "Forget compo.", the Race Controller will be made to believe that there is no component on its channel (even though it says "Checkpoints: 1", due to how it counts checkpoints, but pay no attention to that). As a result, score boards will show "Disconnected (Channel XX)", and starting lights will no longer respond until you connect them again by pressing "Detect compo." again.
Then, when you are finished building your track, you will go to the Maintenance menu and click on "Channel" and enter a new channel to change away from the default, so enter anything but 10 in this box :


This ensures that when you build another track, you won't get any cross-talking. Doing this will also make all the components set to channel 10 change to that new channel as well, so you don't have to do everything by hand, they all follow their Race Controller.
If you want to change the channel of one component individually (Checkpoint, Fault, Obstacle, Starting lights, Score board), simply write the new channel in its Description field, close the Edit window and click on that component to make it reset :

Please note that a Score board must be disconnected for that, otherwise clicking on it simply changes its display mode. To disconnect it, click on the "Maintenance" button, then "Forget compo.".
But you might wonder "What if I had two tracks on channel 10 in the first place ? How do I separate them and stop having one Race Controller control the other's components ?", and that would be a very valid concern. In fact, this will most likely happen to you at some point. You will build a track, work on it, forget to switch it to another channel, then build another one and realize that they both use the same channel, of course that won't work well and you will think there is a bug.
The easiest way to fix that is to reduce the range of the Race Controller you wish to switch to another channel. By default, a Race Controller speaks to all the components in the sim, but clicking on the "Range" button in the Maintenance menu lets you change that range to 100 m, 20 m, 10 m or even mute it completely.
For example, let's say your tracks are more than 100 m apart and all the components within a 100 m radius "belong" to the track you want to change the channel of, and none of the other track is within that range. In this case, press "Range" until it becomes 100 m and you are certain that only its components will follow it to the new channel, and none other.
At worst, you may have to change the Description field of a few leftover components by hand and write the new channel there, then click on them to reset them.
On a side note, the Race Controller does not care in what order the Checkpoints are crossed. All it cares about is that they are all crossed at some point. This is why when you press the Change Direction button, the only thing that happens is the starting positions (the painting near the starting line in most sample tracks) will rotate by 180°... and that's it. Nothing else changes. It's just a cosmetic thing.
Options
If you can afford more prims than just the track and the Race Controller, why not rez some starting lights and score boards ? After all, most racing tracks have those, right ?
Starting lights

You have two versions at your disposal, one vertical and one horizontal. Once connected to the Race Controller, clicking on its "Start" button will activate them all at the same time. Very useful if your track is big and the vehicles in the back may not see or hear the front lights. By the way, the sound of the starting lights is preloaded with a little trick that guarantees that it will always play right away, there will not be any loading time even if it is the first time you hear its sound.
Each set of starting lights takes 5 prims.
Score boards

It is always nice to have a clear view of who's leading, how many laps they have run and how much time they took. For this, you have four different sizes of score boards at your disposal :
- 4 lines (land impact 13)
- 6 lines (land impact 18)
- 8 lines (land impact 23)
- 10 lines (land impact 28)
If there are more racers than lines, those in excess won't be displayed. That's okay, it just means they have to go faster !

Each line displays 40 characters : Team, Name, Laps and Total/Best/Last time (you can switch by clicking on the score board). You can rez as many score boards as you like and scatter them around the track if you want, they will all display the same informations. You can set one to display the total time, another the best time and yet another the last lap time.
Whether you use score boards or not, the Race Controller will say its messages directly on the chat as well, whenever the start/finish line is crossed.
When a racer has specified a team (whether the vehicle has a description or a team was entered manually), and if that team name contains the word "latte", "pink", "gold", "white", "brown", "red", "purple", "blue", "green" or "black", then the score boards will color their line accordingly. Those colors were not chosen randomly, they are the same ones the MG carts use. So if you change the color of an MG cart (say, a Sulky), then the score boards will automatically change the color of the driver's line as well.
The lines are ordered by total times, i.e. the fastest racer is always first in the list. Score boards are updated every time a checkpoint is crossed.
As mentioned above, if you touch a score board, two things may happen :
- If it is connected, it will switch its display mode between "Total time", "Best lap time" and "Last lap time".
- If it is disconnected, and the one touching it is its owner, then it will reset (useful when changing the channel manually, see above).
This concludes the actual manual of the Racing System. If you are interested in knowing how to build your own track, read on. If not, just have fun racing with your friends !
You can find the Racing System in any of the Marine's Goodies vendors, one of them being in Pak :
http://maps.secondlife.com/secondlife/Pak/76/61/105
(it's the small vendor to the left of the RealRestraint one)
Another vendor is in Lineside :
http://maps.secondlife.com/secondlife/Lineside/102/146/77
There are of course other vendors at various public places in SL.
The Racing System is Copy/Modify/No-transfer (the Driver Token and the logos are full perms) and costs L$800.

How to build your own tracks
The sample tracks are functional and fun, but sooner or later you will want to build your own tracks with the pieces provided in the box. Or with any other road kit (a good one I recommend, even if its Land Impact is higher than the pieces I've made, can be found here), or even with your own prims. Or even by rezzing a big platform just under the ground and carving a path with the terraforming tools. The MG carts slow down on Linden ground and register collisions even with it, just like with static objects, so that's a perfectly valid way to build your own track as well, and is quite efficient in keeping the Land Impact low.
All these methods are up to you, all the Race Controller cares about is that the racers cross all the Checkpoints anyway, the rest is none of its concern.
Once again, the best way to learn how to build your own track with the mesh parts included in the box is to rez one of the sample tracks (I recommend Farside) and see how it is built.
The mesh parts
There are six families of mesh parts provided in the Racing System box :
- Roads : Straight, narrowings, curved, sloped, curved & sloped. You have 90° turns, but also left and right 45° and 22.5°, all in sharp, medium and wide versions. It is better to have left and right versions of a 45° or 22.5° turn, because it plays nice with the building grid and makes building a track a lot easier. The roads are by default 4 m wide and most take 1 prim (the wider turns and slopes take 2 prims), but feel free to make them bigger or smaller, it won't make much of a difference in Land Impact.

- Borders : They follow the roads. You will see below that you do not need to rez them yourself, a rezzer can do it for you. Most take 1 prim, except the most complex ones (wide turns, slopes) that take 2 or 3 prims, because their physical envelopes are slightly more complex as well. Speaking of which, you cannot expect the vehicles or avatars to walk into the border objects without roads inside, the physical envelopes do not feature the horizontal parts (as their role is to prevent from moving out of the road, not sinking through it.

- Curbs : Like borders, they follow the roads (except there is no 22.5° and 45° curbs, nor are there sloped curbs or narrowing curbs, it's only straight and 90° ones). And like borders, you can have them rez automatically. They are slightly canted like real-life racing curbs to help the vehicle get back in line, at the cost of speed. As they are more complex than roads and borders, they also take more prims : the straight ones take 1 prim but the curved ones take 4 to 5 prims each.


Please note that you will not find the borders and curbs directly in the same box as the roads, as you probably won't need to rez them yourself, and the rezzer will do it for you (see below). If you really want to rez them yourself, they are contained in the object named "*BorderRezzer", they are copy so you can drag copies out of it.
- Obstacles : Roadblocks and barriers. They are not scripted but you can script them yourself with the "Obstacle" script to make them appear and disappear according to the sub-track (see below).

You can also resize the horizontal part of the metal barrier (the foot is one prim, the barrier itself is another prim) to make it as long as you want :

- Special surfaces : Those surfaces are merely prims with textures and the SpecialSurface script in them, and parameters set into their names. There is grass, dirt, ice, mud, gravel and sand, but also oil and water puddles. Feel free to modify the shape of any of these surfaces as needed.


- Paintings : The two paintings are regular prims, one to designate the start/finish line and one to designate the starting positions. The latter is actually cut in two and has the StartPositions script in it, which is in charge of rotating that prim by 180° whenever you press the Change Direction button on the Race Controller. Of course it must be set to the same channel, so all you need to do is change its Description field and click on it to reset it.

All the mesh objects are very optimized to keep their Land Impact low (as in, less than 1 prim per road, for example, 2 for borders, 4 for curbs, average). Of course, according to SL's way of calculating the Land Impact, stretching a mesh object increases its LI. But you'll see that even for a 8 meters wide road, the Land Impact is still very low.
I recommend you set your RenderVolumeLoadFactor debug setting to 4.0 at least, otherwise the LoD (Level of Detail) of the roads will make them look distorted when seen from a distance.
All these parts have materials applied to them, to make them look more realistic. And this is the main reason why the roads are mesh and not prim. The Land Impact also takes materials into account on regular concave prims (don't ask me why), and it can have really nasty side-effects... For example, here is a comparison between a regular tube (a cylinder is not appropriate for the road texture I made as it does not curve it like a tube does) and a 90° medium turn in mesh :

The mesh curve is on the left, the prim tube is on the right. Both are set to have about the same size in all dimensions (but the tube is effectively twice as big, as it is a prim with a Path Cut that leaves only 1/4th of its geometry visible).


As you can see, the mesh curve is a little more defined than the prim tube, but more importantly, it takes one prim while the prim takes 6 ! Why does a simple regular prim take so much Land Impact ? Simply because it is concave and has materials. But you want to see something even weirder ? Let's make the prim tube as thin as possible :

See that Land Impact ? It takes the equivalent of 40 prims now ! It could be a lot worse, I managed to make a curve take more than 600 prims once. As a result, some objects in my parcel got randomly returned, including important ones like my sales server. Believe me, I wasn't amused.
Long story short, you don't want to make concave prims with materials and a "Prim" Physics Shape. You just... don't. Forget it.
The textures
All the textures are also provided in the box, full-perms, including the funny little sponsors that you see in the Farside track.


Although they are full-perms, you are not allowed to sell them or to include them into any commercial project without my prior written authorization. If you wish to create derivative works of these textures, please give credit to me for the original work, and include the following disclaimer.
Disclaimer : The original logos are the property of their respective owners (Shell, MasterCard, Nascar Racing, Sony, Red Bull, Rubbermaid, Good Year and Man Trucks). The logos provided here are not officially authorized by, endorsed by or associated with any of them. More over, these modified logos are not at all intended to defame or criticize the original brands in any way, nor to create confusion as to which is the real brand. Those logos are simply cute parodies of existing real-life brands.
The textures are categorized in "DIF" (diffuse, the standard texture channel), "NOR" (normal, the normal channel, also sometimes called bump channel) and "SPE" (specular, which gives the surface its shine). Be careful when applying materials to a regular prim though, as stated above, make sure it is either convex, or set to "Convex" Physics Shape, or that you have enough prims on your land. I decline all responsibility for any damage caused by an unfortunate Land Impact calculation due to applying my textures as materials to a concave prim.
Linking the mesh parts
It is always a good idea to try and link as many parts as possible once you're done building your track, because most mesh parts take less than 1 prim (but they take exactly 1 prim when not linked, as SL rounds the Land Impact count up for each individual object). This way you can lower the Land Impact of your whole track significantly. For example, the Glenfiddle sample track took 64 prims while not linked, down to 55 prims once linked in two big parts (you can't link over a certain distance).
Be careful not to make any Special Surface the root prim of your link though. Or any prim that contains a script that detects collisions for that matter, as your vehicle would believe it is colliding with it wherever it goes. This is because unscripted prims pass collisions on to the root prim of the same object.
In plain English, do not make a grass special surface the root prim of your object, or else your MG cart will have its speed reduced due to it believing it is driving over grass, even when it is actually on the road. And that would not be a bug in the cart, it would simply be the consequence of how SL handles collision events in unscripted child prims.
Rezzing checkpoint
If the Race Controller is the brain of a track, Checkpoints are its sensors. They are what guarantees that the racers effectively run through the whole track instead of taking shortcuts. After all, building a road is all good and well but what tells you the racers will want to follow them ? They're not there to enjoy the scenery, they're there to reach the finish line as soon as possible !
This is why you need checkpoints in strategic spots, places where you absolutely want the racers to go.
There are checkpoints in the product box : one is named "Line" and the other is named "Checkpoint". They both use the same script but their name defines their role :
- Rez a copy of "Line" upon the start/finish line (you can have two if the start and finish line are different).
- Rez a copy of "Checkpoint" in every place you want your racers to go.
Internally, checkpoints all have a unique number from 0 to 31. Unique to a single track, that is. You do not have to bother with giving them a number yourself, the Race Controller takes care of giving them all a unique number upon its component detection. You can see which checkpoint has been given what number by looking at it closely while it is visible, there is a small number in white appearing above it (it disappears when the checkpoint becomes invisible again). A "Line" object is always number 0, and a "Checkpoint" object is always number 1 to 31.
As stated above, the Race Controller does not care in which order the Checkpoints are crossed, it cares only about the fact that they are all crossed at least once during the lap, so feel free to simply shift-drag a checkpoint over to another place on the track to duplicate it. The Race Controller takes care of the rest anyway.
You could wonder why the order is not important. It could be a good idea to be able to notify a racer that a checkpoint has been missed, right ? Maybe... Problem is, it would make building sub-tracks a lot more difficult and redundant. So it is easier not to care about the numbers but only to make sure that they are unique. When a racer misses a checkpoint, the race is pretty much over for them anyway, so whether they are notified at the next checkpoint or at the starting line (with an "incomplete lap" message) is of little importance, as they are going to go back to the starting line eventually. Not caring about the order simplifies matters a great deal.
A good practice is to have at the very least one Line and two Checkpoints. One placed roughly at the first third of the track, and the second one placed roughly at the second third. If you had only one checkpoint on the track, you wouldn't be able to guarantee that it is rezzed exactly halfway, so the racers could decide to turn around if they realized that the drive they just did from the line to this unique checkpoint is shorter than the one left to do by covering the rest of the track. Yes, that's cheating and no, you don't want that. And the Race Controller would not detect it, so you need at least two Checkpoints.
The rest depends on whether you prefer placing obstacles or special surfaces to keep them from cutting through turns, or placing more checkpoints along the track to ensure they drive to the important spots. The choice is entirely yours.

If you have several "Line" objects in your track, this means that whichever is crossed will possibly make the racer complete a lap. This is useful when you want open tracks (race from point A to point B instead of doing whole laps), but also if you want different sub-tracks to start from different places. This also means that you need at least two Checkpoints or all your racers will have to do is cross the starting line, turn around then cross it again to complete a lap. You don't want that, of course. An example of an open sub-track is the "straight" sub-track of the Farside sample track.

Once you have rezzed your Checkpoint, it should register itself to the Race Controller automatically, triggering a component detection. Still, it is a good idea to click on the Maintenance button of your Race Controller, then to select "Detect compo." when you are done rezzing your Checkpoints, to ensure that they are all registered.
You may notice that some checkpoints in the sample tracks have numbers at the end of their names, like "674", "352" etc. Pay no attention to that, this is due to BuildBox automatically renaming objects with redundant names (instead of letting SL do it by itself once the objects are put into the box). Those numbers are irrelevant to the Race Controller.
The rezzer
You may want to rez borders around your roads, to avoid letting the vehicles cut corners or go off-track, or for whatever other reason. But you don't want to position those borders yourself, as it would mean doing the same work twice... Well you don't have to. There is a rezzer in the box that will do it for you.
The rezzer itself looks like a big white glowing orb stretched up. It is contained in the road kit box and is named "*BorderRezzer". Click on it and choose the kind of border you want to rez. You have concrete and plastic borders and half borders, and concrete curbs. Only full borders (concrete and plastic) are available for all road parts. Half borders are only for straight lines, and curbs are only for straight lines and 90° curves.


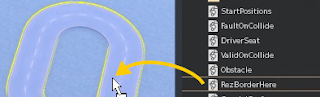
Once you have selected which border you want to rez, drop a copy of the "*RezBorderHere" script (contained in the same box) inside a road part and watch what happens.
Let's say I rez 6 parts to make a simple circular track. As they are unlinked, the whole set takes 6 prims :


The rezzer chooses the appropriate border and rezzes it exactly at the right position, rotation and scale for you. But there's more ! What if you don't want to do this for every mesh part ? The answer is simple : link your parts !

Notice that once linked, the whole set takes only 3 prims instead of 6, so linking indeed is a way to save prims.
Now that the roads are linked, drop your "RezBorderHere" script in that object and watch :

Done ! All the roads in the object have a border now. And since the road parts were well placed (by snapping them on the building grid, you avoid any overlap and seam), the borders are well placed too. Please note that the borders themselves are not linked after rezzing them, you'll have to link them yourself. Also note that they are not scripted either, and were not when inside the rezzer.
Special surfaces
These surfaces are useful only if you drive an MG cart, as they are not compatible with any other kind of vehicle. In short, they are meant to modify its handling when it drives over them (usually for the worst). Think grass, sand, pebbles and the like, knowing that those carts are meant to be driven on the road. Of course, not all carts are equal when it comes to off-roading, but the point still stands.

To make a special surface, simply copy one from the box, or create your own and put a SpecialSurface script in it. Then add between 1 and 6 numbers after its name, between parenthesis. Example : "Grass (0.75 0.75 0.8 0.8)".
- The first number is the speed factor, it multiplies the effective speed of the cart.
- The second number is the turn factor, it multiplies how fast the cart turns.
- The third number is the linear friction factor, the higher the less friction so the more time it takes to stop moving.
- The fourth number is the angular friction factor, the higher the less friction so the more time it takes to stop turning.
- The fifth number is the boost factor, multiplying the effective speed of the cart, while NOT reversing to 1 when leaving the surface (unlike the speed factor).
- The sixth number is the boost decay, which is how much to multiply every 0.25 second the boost factor by, until it goes back down to 1. Values higher than 0.999 are treated like 0.999. For example, a boost factor of 2 with a decay of 0.9 would become 1.8, 1.62, 1.458, 1.3122 and so on until it reaches 1 or less (then the boost factor is no longer taken into account).
If you omit some numbers, default values will be chosen instead. You don't need to reset the script after changing the name of the object.
If the fifth and sixth numbers are set to 0, the current boost factor and decay are unchanged, so you can boost and cross mud without losing your boost factor (even though you'd be slowed down by the mud, the boost factor would still be there).
Please note that overlapping several surfaces is not a concern, as the cart knows which surface has modified its factors last, and only that surface can cancel them back to their normal values of 1 each when exiting it.
Linden land (the land that you walk on when at ground level and not on any prim) has its own values : speed factor x0.75, turn factor x0.75, linear friction factor x2, angular friction factor x2, boost factor unchanged.
Good values for common surfaces would be :
- Curb (0.8 0.9 1 0.7)
- Dirt (0.85 0.85 0.75 0.6)
- Grass (0.75 0.75 0.8 0.8)
- Gravel (0.7 0.7 1 1)
- Sand (0.6 0.6 1 1)
- Mud (0.5 0.5 1 1)
- Moisture (1 1 0.75 0.75)
- Wetness (1 1 0.5 0.5)
- Oil (1 1 0.25 0.25)
- Ice (1 1 0.1 0.1)
- Booster (1 1 1 1 4 0.9)
The carts all have an "offroad" value that is between 0.0 and 1.0, the higher the more sensitive to offroad driving. The most sensitive is the Sulky, the least sensitive is the 4-pony Phaeton, which barely notices when it goes off-road.
If you like racing video games like Mario Kart, why not design a weapon that shoots mud or oil at the other racers ? With the "SpecialSurface" script, and some building and scripting skills, you have all that you need to make your own way of fighting your opponents !
Faults
Sometimes you want the racers to simply avoid some areas, without actually rezzing obstacles (if you're short on prims, or you don't want to deface a pretty scenery, for example). Or you want them to simply avoid colliding into stuff, like ponies running through a steeple course (each collision with a hurdle registering a fault, adding time to the lap time).
The easiest way to do this is to rez a Fault prim like you rez a Checkpoint. Name it like this :
Name (penalty_in_seconds object_type)
Example : "Fault (10 2)"
Where "Fault" is anything you like (the faults in Willow Woods are named "Don't go there"), the "10" stands for "add 10 seconds to the lap time of anyone who collides with this prim" and "2" stands for "standalone and volume detect".
- The name is anything you want, just don't use brackets or parenthesis please, it would confuse the script.
- Penalty_in_seconds is a number which tells the Race Controller how many seconds to add to the lap time (and therefore total time) of anyone who collides with this prim.
- Object_type can be 0, 1 or 2, depending on what this object is.
* 0 is for static, solid objects like hurdles. You don't want the racer to go through them, but you want the fault to register when they bump against them.
* 1 is for solid but invisible objects that the racers can't go through and that will register a fault when bumped into. Think invisible obstacles.
* 2 is for invisible objects that the racers can go through and that will register a fault when they do. Think detection areas. The ones in Willow Woods and Farside are type 2.
When Object_type is 1 or 2, the fault object flashes when the appropriate sub-track is selected, or when "Show chkpts." is pressed on the Maintenance menu of the Race Controller. Type 0 faults do not change any of the properties of the objects they are dropped into, so it can be useful for making already existing obstacles register faults when collided with.
Like Checkpoints, Faults are to be connected to the Race Controller, i.e. be set to its channel. Change its Description field and click on it to reset it.
Sub-tracks
There we go, here is how to create sub-tracks. This is advanced stuff but if you've read this far, you must be willing to make a sophisticated track !
Very often, in real-life racing tracks (Go-Karts, Formula 1 etc), the race can be done on just a portion of the track, simply by moving some barriers, opening some shortcuts and closing others. This usually dramatically changes the shape of the track and allows featuring several tracks in one, saving space and resources.
The same thing is possible here, by selecting the sub-track you want before you race. Once again, it is a good idea to inspire yourself from either the Chatterley or the Farside sample tracks, as they both feature sub-tracks with vanishing obstacles, which is probably what you will want to do as well.
Here are the 3 sub-tracks in Chatterley, with the Checkpoints shown :

Short

Medium

Long
To declare that a component (Checkpoint, Fault, Obstacle) is part of a sub-track, you simply add the name of this sub-track to its own name, between brackets, and separated by commas if it is part of several sub-tracks. For example : "Checkpoint [medium,long]" or "Roadblock dirty [short,medium,long]". Do not add spaces next to the commas inside the brackets. You don't have to reset the component after changing the part between brackets, but you will have to do a "Detect compo." on the Race Controller once you're done.
Once the detection is complete, the list of sub-tracks will be available through the "Sub-track" button of the Race Controller. Its menu is populated with all the sub-tracks you've declared (simply by adding their names to the components names), and the list is sorted alphabetically.
When a sub-track is selected, the following events happen :
- All Checkpoints, Faults and objects with an Obstacle script in them, flash if their names contain the name of the sub-track, while all the others are hidden.
- All the Checkpoints, Faults and objects with an Obstacle script in them, will not do anything when crossed if they do not have the name of the current sub-track in their own names.
Obstacles
The "Obstacle" script provided in the box is meant to be placed into any prim or mesh object that is supposed to hide and show itself according to the sub-track currently in use. By "hide and show", I also mean "be phantom and solid" respectively. In other words, "be an obstacle that matters only in some sub-tracks".
"Obstacle" might not be the best word for it, as some "Obstacles" are in fact not obstacles at all, for example curbs, starting positions and even the starting line can be turned into "Obstacles" with this script, and be hidden and shown according to the selected sub-track. That's exactly what the Farside track does, actually : it hides its curbs, starting lines and positions when you change its sub-track.
Simply drop this script into any object that is part of some sub-tracks and not others, such as a roadblock that is there to guide the racers (but also to keep them from crossing the shortcuts they block the way to). Of course, once again, the channel of this object must be the same as the Race Controller. Touch the object after changing its Description field if you need to change its channel.
Thank you for reading this manual, and I hope you will enjoy your Racing System and racing with your friends !
Have fun !
Marine
Subscribe to:
Posts (Atom)

