Hi there,
Here is the latest version of the RLV, with a couple bug fixes, but more importantly, support for the new FittedMesh feature !
If you don't know about FittedMesh, this is a very new feature that hit the grid recently, that allows rigged mesh (mesh attachments that follow your movements) to be deformed by your shape sliders.
It doesn't spare you from having to wear alpha masks, but it does let rigged mesh fit you much more easily. That decreases the need for the common "XS", "S", "M", "L" and "XL" variations of the same rigged mesh, when it comes to clothing. I'm very enthusiastic about FittedMesh, I feel it is going to bump the clothing business a notch higher in terms of quality.
Anyway, along with FittedMesh support, the new RLV comes with the following changes :
- changed : Do not block llRegionSayTo on channel 0 even when @recvchat or @recvemote is active, because this kind of chat is very similar to a task IM (an IM from an object to an avatar), only without the built-in delay and valid only in the same sim. Thanks Felis Darwin for the report.
- fixed : RenderResolutionDivisor was broken in deferred rendering (again).
- fixed : @remoutfit=force didn't care about "nostrip" in the folder name (only in the item name). Thanks Kinki Aftermath for the report.
You can download the viewer here :
Real Restraint
And the MD5 hash for the Windows installer is :
4b692e9df50d9547a960b07e50138b77
Have fun !
Marine
Saturday, February 22, 2014
Friday, February 14, 2014
RR tutorial : Wriggle v2
Hi !
Today I'm going to show you an old new plugin : the Wriggle plugin.
Wait, is it old or new ? Well, it is an old plugin as it has been introduced into the RealRestraint brand years ago, in fact nearly since the beginning, but it is new because this tutorial is about the second version of it. I never had the time to make a tutorial for the first version, and although it was working, I've been so bad at making it usable that very few people knew it even existed.
Hence the total rewrite, and hence the tutorial. I know that such a plugin makes bondage even more enjoyable for the sub, and is a nice addition to being able to choose the pose thanks to the Anim plugin.
So what's this "Wriggle" thing anyway ?
You already know that since v1.22 of the RealRestraint products, you are able to change your pose while in bondage. For example, lifting your hands, kneeling or sitting down, rolling over, anything you can think of, that doesn't change the bondage itself. To do this, you simply use the RR Anim HUD (included with every arms and legs restraint) to browse through the many available animations, until you find the one you like.
But there are cases when you may want to go further, and you can't do that just with the Anim HUD. For example, you may want to lay down while you're made to stand with your legs tied, or the opposite (you are bound laying down and you want to stand up), or your hands are tied behind your back and you want to bring them to the front (or the other way around). But doing that changes more parameters than just your pose : the speed of movement (you hop faster than you crawl), the touch restrictions (which may be different when your hands are in front than when they are behind your back), and so on.
All these transitions are realistic, you can do them in real life, but without the Wriggle plugin you can't in SL. This is because they technically make you change the lock itself (from "Tight" to "Lie" and back, from "Hands back" to "Hands front", etc), and that means changing some restrictions and other settings along with it.
This is where the Wriggle plugin comes in handy. It allows you to try your luck at changing to another lock (when permitted), in exchange for some time and some energy cost. The same energy that is used for struggling. So in the end, that comes down to choosing between either trying to struggle out, or getting comfortable in bondage.
So, in short, the Wriggle plugin is like a bridge between one lock and another, provided that bridge makes sense.
Ok enough talk, let's do it ! The plugin itself is pretty easy to use, you generally have only one button to click, the real difficulty is deciding whether to click it or not.
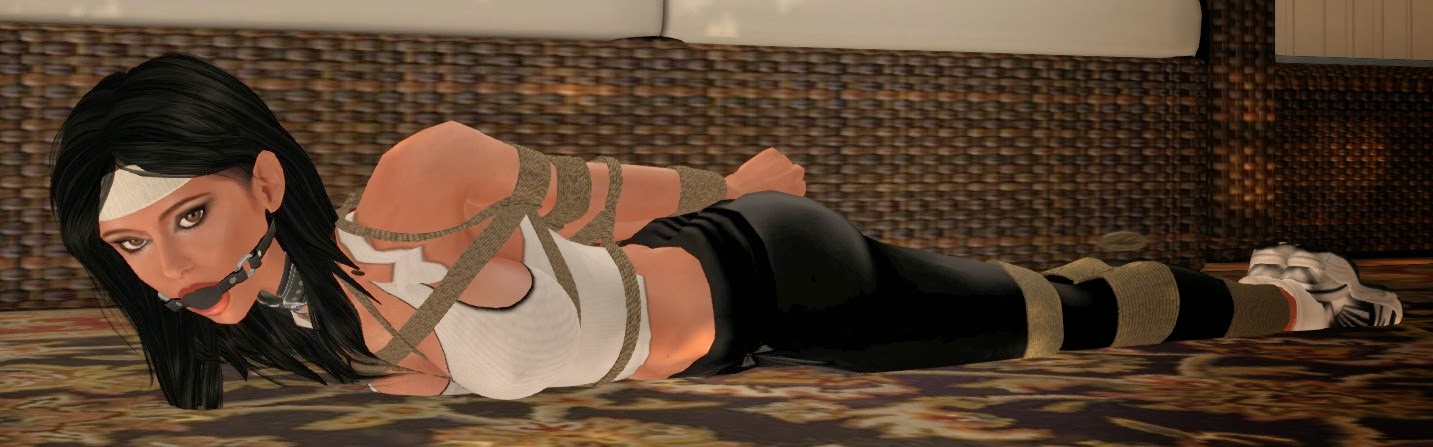
Let's say my hands are tied behind my back with Siren ropes, and I want to bring them in front of me. In real life, that would imply trying to get them past my butt, then between my legs, and finally stepping out. The first part is what requires nimbleness and effort, and is not guaranteed to succeed.
 Oh, of course I could raise my arms behind my back, change the pose a little...


... but I want them to go to the front instead.
Firstly, I go to the plugin itself by clicking on my ropes, then going to "Plugins..." > "Wriggle...". Note that only the wearer has access to that plugin and nobody else.

Ok so I have only one button at my disposal, and a few information on the menu itself, such as the energy left. Notice that this is the same energy that is written on the main page of the restraint, only in decimal (*) with a one-digit precision.
It also says... let me scroll down on the menu :

This little text is displayed as a short manual, it doesn't change.
So I click on "Hands front" and...

Aha, there is a lot more information here now. Let me explain.
Firstly, now that the plugin knows which direction to take (I had only one choice but in theory there could have been several), it knows the actual objectives and costs to reach it, and it displays them in plain text. We have :
So, to recap, every time I click on "Hands front" to try to wriggle my hands from the back to the front, it costs me 0.3 energy, I have 10% chance of success, and I must get 3 successes in order to get there. Dandy.
Ok, let's try my luck today. I click on "Hands front" (what choice do I have anyway ?). Nothing, I just lose energy. I click and click, still nothing. I click some more, until...
Yes ! I'm making progress now. I guess this is going to take a while and cost me, since every try has only 1/10th chance of making progress at all. And the menu warns me that if I choose another target (I can't here, since I have only one choice) or if I move, I'll lose all my progress !
So, better not move and keep wriggling. I click and click and click, and eventually...

Making progress ! But my energy is going down, I'm at 26.5 now. It's not too bad, but it would seriously complicate my attempts to struggle out, if I needed to.
I click, click, click, and finally...

Woohoo ! I successfully wriggled my hands to the front ! Depending on the situation and on how my restraints are set, this may earn me a few perks like being able to touch things, and the like. It could actually seriously change things, this is not just for show.
And the menu now switches to asking me where I want to wriggle to. I've been able to wriggle my hands from back to front, I could want to go back. Notice the energy is not replenished :

This is one very important thing about the Wriggle plugin : when you successfully wriggle to another lock, neither your energy nor the sequence of struggles to take is reset. They stay the same !
Interestingly, the costs are identical (and my energy has decreased further), but the chance is twice as high now. This is because it is actually easier to wriggle your hands from the front to the back, than the other way around, but every attempt is just as tiring.
We're almost done, as you see there is not much to know about the Wriggle plugin, but there is one additional subtlety. Just like in real life, it is easier to wriggle your hands from back to front if your legs are free or loosely tied, than if they are tightly tied together. Even more so if you're hogtied. It is possible, but much harder.
To simulate this, every Wriggle plugin communicates with the other Wriggle plugins worn by the same avatar, and every time one of them is locked, the others are told about it. Every Wriggle plugin has a list of modifiers per lock that it transmits to the other restraints, in order to find out the final cost of every attempt.
This is the "+0" part you've seen on the menu until now. When other restraints are added, the "+0" becomes "+1", "+2" etc. Let's see :
I tie my hands behind my back again, but this time with my legs tied together.

I go to the Wriggle plugin of the hands and click on "Hands front" once :

See what I mean ? The "3+0" part became "3+2", because the legs add 1 to the cost and there is one additional restraint besides the arms ropes, bumping the cost from 0.3 to 0.5 per attempt.
The actual calculation is :
Current difficulty + Highest modifier + Nb restraints - 1
"Highest modifier" being the highest of all the modifiers coming from all the other Wriggle plugins.
Now what if I chose to be hogtied ?

I go to the Wriggle plugin and check :

Oh, it bumped to +4 now ! See how much harder it would make my attempt at wriggling my hands to the front ? Not impossible, but much more tiring !
Likewise, suppose I want to lie down in this bondage (and suppose I can't just tie myself that way, for the sake of the demonstration).
Once again, if the Wriggle plugin didn't exist, I would be able to kneel, to sit down...

... but not actually lie down, because if I could I should not have any guarantee that I could get back up to my feet. That's why I need the Wriggle plugin of the legs ropes to do this.
Right now only my wrists are tied, so I click on the legs ropes and look at their plugin :
 Oh, it actually looks quite easy. Cost is 2+2 and 40% chance per attempt, the "+2" part coming from the wrist rope and the fact that there are two restraints in total. Piece of cake.
Of course piece of cake, I'm just trying to get my butt down on the floor. Anyone can do that. But the other way around is trickier ! Let me try that now. I want to go to the Tight position while lying on the floor :


Ah. Yes, that's more serious indeed. Cost is 3+2 and 20% chance per attempt. Not so easy anymore, but doable.
But what if my arms were bound much more tightly ? Like, say, in "Supertight" ?

How hard do you think this would be ?

Gosh ! It costs 3+7 per attempt ! One full energy point ! And still 20% chance, it's not actually harder but much more tiring. This is because in this bondage, I have less leverage with my arms than in a simple wrist tie. Makes sense, doesn't it ?
Of course, when bound in "Supertight", I wouldn't be able to wriggle my arms to any other tie, so if you looked at the Wriggle plugin of the arms ropes, it would not give you any choice, the menu would be empty.
On a side note, you can always attempt to wriggle, even when your energy has reached zero. You just can't struggle out until you recover some energy, and your chances of wriggling are brought down to a pitiful 2% per attempt. So it is possible, but likely to take a while. And remember, you mustn't move while wriggling or you'll lose all your progress !
Also, you may have noticed that since v1.24 you are able to use the RR Anim HUD to lie down when your legs are in Taut or Hobble. This makes sense because it is rather easy to lie down and to stand up when your ankles are not bound (or loosely), and if the Wriggle plugin were necessary for this, then it would mean you'd go into the actual "Lie" lock, which shows more restraints. It would not be realistic.
So, that's pretty much it. The Wriggle plugin is present in nearly all the restraints, even gags. Yes, you read that right : gags. But only those that don't change look when changing lock. This is because sometimes you want to loosen your gag yourself, because you know you have more chance at doing it than trying to completely struggle out of it. Or the opposite : sometimes the gag is not tight enough for you ! Or maybe you are wearing two gags and your captor was sloppy and them both to "Tight" before they left for the day, making you mumble twice when you speak. When you wear more than one gag at the same time, all of them except one (at most) must be set to "Total", making it so you only mumble once, at most, per chat message. The Wriggle plugin saves you in that case.
What do you mean "let's check it out" ?
No, don't... MMMmmph !!
Have fun !
Marine
(*) For those who make plugins for the RR products, don't fret. The energy stored by the main script is still an integer, the decimal is just additional information held by Wriggle itself, the interface to the plugins does not change.
Today I'm going to show you an old new plugin : the Wriggle plugin.
Wait, is it old or new ? Well, it is an old plugin as it has been introduced into the RealRestraint brand years ago, in fact nearly since the beginning, but it is new because this tutorial is about the second version of it. I never had the time to make a tutorial for the first version, and although it was working, I've been so bad at making it usable that very few people knew it even existed.
Hence the total rewrite, and hence the tutorial. I know that such a plugin makes bondage even more enjoyable for the sub, and is a nice addition to being able to choose the pose thanks to the Anim plugin.
So what's this "Wriggle" thing anyway ?
You already know that since v1.22 of the RealRestraint products, you are able to change your pose while in bondage. For example, lifting your hands, kneeling or sitting down, rolling over, anything you can think of, that doesn't change the bondage itself. To do this, you simply use the RR Anim HUD (included with every arms and legs restraint) to browse through the many available animations, until you find the one you like.
But there are cases when you may want to go further, and you can't do that just with the Anim HUD. For example, you may want to lay down while you're made to stand with your legs tied, or the opposite (you are bound laying down and you want to stand up), or your hands are tied behind your back and you want to bring them to the front (or the other way around). But doing that changes more parameters than just your pose : the speed of movement (you hop faster than you crawl), the touch restrictions (which may be different when your hands are in front than when they are behind your back), and so on.
All these transitions are realistic, you can do them in real life, but without the Wriggle plugin you can't in SL. This is because they technically make you change the lock itself (from "Tight" to "Lie" and back, from "Hands back" to "Hands front", etc), and that means changing some restrictions and other settings along with it.
This is where the Wriggle plugin comes in handy. It allows you to try your luck at changing to another lock (when permitted), in exchange for some time and some energy cost. The same energy that is used for struggling. So in the end, that comes down to choosing between either trying to struggle out, or getting comfortable in bondage.
So, in short, the Wriggle plugin is like a bridge between one lock and another, provided that bridge makes sense.
Ok enough talk, let's do it ! The plugin itself is pretty easy to use, you generally have only one button to click, the real difficulty is deciding whether to click it or not.
Let's say my hands are tied behind my back with Siren ropes, and I want to bring them in front of me. In real life, that would imply trying to get them past my butt, then between my legs, and finally stepping out. The first part is what requires nimbleness and effort, and is not guaranteed to succeed.
... but I want them to go to the front instead.
Firstly, I go to the plugin itself by clicking on my ropes, then going to "Plugins..." > "Wriggle...". Note that only the wearer has access to that plugin and nobody else.
Ok so I have only one button at my disposal, and a few information on the menu itself, such as the energy left. Notice that this is the same energy that is written on the main page of the restraint, only in decimal (*) with a one-digit precision.
It also says... let me scroll down on the menu :
This little text is displayed as a short manual, it doesn't change.
So I click on "Hands front" and...
Aha, there is a lot more information here now. Let me explain.
Firstly, now that the plugin knows which direction to take (I had only one choice but in theory there could have been several), it knows the actual objectives and costs to reach it, and it displays them in plain text. We have :
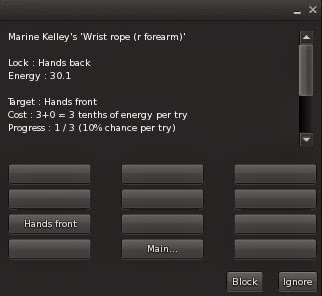
- The current lock, here it is "Hands back"
- The current energy, it seems 34.0 has become 33.7, because I have made one attempt already
- The current target, here it is "Hands front", because I want to wriggle my hands from the back to the front
- The current cost, it is 3 + 0 = 3 "tenths of energy per try", in other words 0.3 energy point, which explains why 34.0 became 33.7 after the first try
- The progress done, which is a glorious 0 (and I must reach 3) with... ouch, 10% chance per try. That's steep !
So, to recap, every time I click on "Hands front" to try to wriggle my hands from the back to the front, it costs me 0.3 energy, I have 10% chance of success, and I must get 3 successes in order to get there. Dandy.
Ok, let's try my luck today. I click on "Hands front" (what choice do I have anyway ?). Nothing, I just lose energy. I click and click, still nothing. I click some more, until...
Yes ! I'm making progress now. I guess this is going to take a while and cost me, since every try has only 1/10th chance of making progress at all. And the menu warns me that if I choose another target (I can't here, since I have only one choice) or if I move, I'll lose all my progress !
So, better not move and keep wriggling. I click and click and click, and eventually...
Making progress ! But my energy is going down, I'm at 26.5 now. It's not too bad, but it would seriously complicate my attempts to struggle out, if I needed to.
I click, click, click, and finally...
Woohoo ! I successfully wriggled my hands to the front ! Depending on the situation and on how my restraints are set, this may earn me a few perks like being able to touch things, and the like. It could actually seriously change things, this is not just for show.
And the menu now switches to asking me where I want to wriggle to. I've been able to wriggle my hands from back to front, I could want to go back. Notice the energy is not replenished :
This is one very important thing about the Wriggle plugin : when you successfully wriggle to another lock, neither your energy nor the sequence of struggles to take is reset. They stay the same !
Interestingly, the costs are identical (and my energy has decreased further), but the chance is twice as high now. This is because it is actually easier to wriggle your hands from the front to the back, than the other way around, but every attempt is just as tiring.
We're almost done, as you see there is not much to know about the Wriggle plugin, but there is one additional subtlety. Just like in real life, it is easier to wriggle your hands from back to front if your legs are free or loosely tied, than if they are tightly tied together. Even more so if you're hogtied. It is possible, but much harder.
To simulate this, every Wriggle plugin communicates with the other Wriggle plugins worn by the same avatar, and every time one of them is locked, the others are told about it. Every Wriggle plugin has a list of modifiers per lock that it transmits to the other restraints, in order to find out the final cost of every attempt.
This is the "+0" part you've seen on the menu until now. When other restraints are added, the "+0" becomes "+1", "+2" etc. Let's see :
I tie my hands behind my back again, but this time with my legs tied together.
I go to the Wriggle plugin of the hands and click on "Hands front" once :
See what I mean ? The "3+0" part became "3+2", because the legs add 1 to the cost and there is one additional restraint besides the arms ropes, bumping the cost from 0.3 to 0.5 per attempt.
The actual calculation is :
Current difficulty + Highest modifier + Nb restraints - 1
"Highest modifier" being the highest of all the modifiers coming from all the other Wriggle plugins.
Now what if I chose to be hogtied ?
I go to the Wriggle plugin and check :
Oh, it bumped to +4 now ! See how much harder it would make my attempt at wriggling my hands to the front ? Not impossible, but much more tiring !
Likewise, suppose I want to lie down in this bondage (and suppose I can't just tie myself that way, for the sake of the demonstration).
Once again, if the Wriggle plugin didn't exist, I would be able to kneel, to sit down...
... but not actually lie down, because if I could I should not have any guarantee that I could get back up to my feet. That's why I need the Wriggle plugin of the legs ropes to do this.
Right now only my wrists are tied, so I click on the legs ropes and look at their plugin :
Of course piece of cake, I'm just trying to get my butt down on the floor. Anyone can do that. But the other way around is trickier ! Let me try that now. I want to go to the Tight position while lying on the floor :
Ah. Yes, that's more serious indeed. Cost is 3+2 and 20% chance per attempt. Not so easy anymore, but doable.
But what if my arms were bound much more tightly ? Like, say, in "Supertight" ?
How hard do you think this would be ?
Gosh ! It costs 3+7 per attempt ! One full energy point ! And still 20% chance, it's not actually harder but much more tiring. This is because in this bondage, I have less leverage with my arms than in a simple wrist tie. Makes sense, doesn't it ?
Of course, when bound in "Supertight", I wouldn't be able to wriggle my arms to any other tie, so if you looked at the Wriggle plugin of the arms ropes, it would not give you any choice, the menu would be empty.
On a side note, you can always attempt to wriggle, even when your energy has reached zero. You just can't struggle out until you recover some energy, and your chances of wriggling are brought down to a pitiful 2% per attempt. So it is possible, but likely to take a while. And remember, you mustn't move while wriggling or you'll lose all your progress !
Also, you may have noticed that since v1.24 you are able to use the RR Anim HUD to lie down when your legs are in Taut or Hobble. This makes sense because it is rather easy to lie down and to stand up when your ankles are not bound (or loosely), and if the Wriggle plugin were necessary for this, then it would mean you'd go into the actual "Lie" lock, which shows more restraints. It would not be realistic.
So, that's pretty much it. The Wriggle plugin is present in nearly all the restraints, even gags. Yes, you read that right : gags. But only those that don't change look when changing lock. This is because sometimes you want to loosen your gag yourself, because you know you have more chance at doing it than trying to completely struggle out of it. Or the opposite : sometimes the gag is not tight enough for you ! Or maybe you are wearing two gags and your captor was sloppy and them both to "Tight" before they left for the day, making you mumble twice when you speak. When you wear more than one gag at the same time, all of them except one (at most) must be set to "Total", making it so you only mumble once, at most, per chat message. The Wriggle plugin saves you in that case.
What do you mean "let's check it out" ?
No, don't... MMMmmph !!
Have fun !
Marine
(*) For those who make plugins for the RR products, don't fret. The energy stored by the main script is still an integer, the decimal is just additional information held by Wriggle itself, the interface to the plugins does not change.
Thursday, February 13, 2014
RR tutorial : Autolock plugin v2
Hello there, we are going to dwell into another one of the most complete and versatile plugins in the RR suite : the Autolock plugin. It is also part of the standard issue, so every restraint has one.
You have already heard about normal keys, RealKeys (I hope), release timers, long timers, RL timers etc etc... yes that's beginning to be a lot of concepts to learn. The Autolock uses all these concepts and more, so this is complex stuff. Very few people grasp all its subtleties, so don't be ashamed if you master only 25% of its capabilities. Bear with me, this tutorial is going to be very long.
Please note that this is the second version of the Autolock plugin, this one is a complete rewrite and has been introduced in v1.24 of the RR products. You can find the tutorial for the old version here.
There are multiple purposes to this plugin : you could want to program your bottom's restraints to automatically lock themselves after a while while she's wandering around, or you could want to make her already tight bondage vary a little over time, or you could want to make her struggles even more difficult by regularly re-locking her restraints even when you are not around... It's quite versatile.
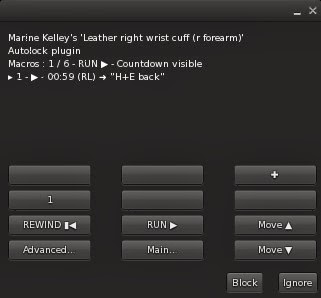
Before we start explaining what this plugin is all about, let's take a look at its menus first. I click on my Vixen cuffs and I go to "Plugins..." > "Autolock..." :
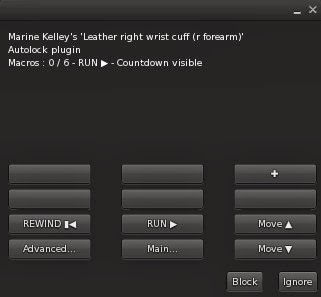
What you see is the (currently empty) list of "macros" to be run by the Autolock. But as written on the top of the menu, "Macros : 0 / 6" so... not much is going to happen here until I do something about it.
But what is a macro ? Does it have something to do with Word or Excel macros ? As a matter of fact, it does, loosely. A macro is simply a programmed lock with a delay (when to lock), a level (which lock to choose), a timer (how long will it stay locked that way) and other options (will the keys be left or taken, will it start counting now or when the restraint is unlocked, stuff like that).
Ok this is all too theoretical so how about an example ? Let's do this. I click on the big "+" button on the upper right corner, and I get this menu :
Whoa. What is all this ? There sure is a lot of information in there. Where to begin ?
In fact we are not going to review it now, let's just press "CONFIRM" and see what happens.
Ok this is interesting : the menu shows me there is a macro in the list, that it is running, there is some kind of countdown that shows "01:00 (RL)" and that it will lock to "H+E back", which is the lock that was used last on these cuffs. Oh, and the chat says :
[01:26] Leather right wrist cuff (r forearm): : Device autolocking in 1 hour.
Ok, fine, one hour it is. I'll wait...
*Files her nails*
*Watches TV*
[02:56] Leather right wrist cuff (r forearm): : Device autolocking in 30 minutes.
*Pays no attention to the chat*
*Goes shopping*
*Falls in love with shoes*
[02:16] Leather right wrist cuff (r forearm): : Device autolocking in 10 minutes.
*Still pays no attention to the chat*
*Goes shopping some more*
[02:21] Leather right wrist cuff (r forearm): : Device autolocking in 5 minutes.
[02:24] Leather right wrist cuff (r forearm): : Device autolocking in 2 minutes.
[02:25] Leather right wrist cuff (r forearm): : Device autolocking in 1 minute. Last warning, get ready...
Suddenly I am stopped dead in my tracks by a familiar noise and my arms are rudely cuffed behind my back in front of everyone.
[02:26] Leather right wrist cuff (r forearm): Marine's Leather right wrist cuff (r forearm) automatic lock triggered
[02:26] Leather right wrist cuff (r forearm): Marine has been locked by Marine ("H+E back").
[02:26] Leather right wrist cuff (r forearm): Marine's Leather right wrist cuff (r forearm) automatic lock triggered
Executing macro 1/1
Type : H+E back
Timer : --:--
Keys taken
Block : DEFAULT
Mouselook : DEFAULT
Who the hell... Oh I understand, I was so busy I completely forgot about that autolock and now I'm stuck ! Ok, ok, it's not that bad, I still have my own keys and no timer is set, so I can unlock myself, which I do now.
Then I take a look at the Autolock menu again, and... oh this is interesting :

The menu shows me the macro, but it is now "stopped" (I can tell from the big square icon on its line). Does this mean it won't trigger anymore ?
Ok, so let's review what happened here during this quick example.
The macro that was created had default settings since I hit "CONFIRM" without changing anything. These default settings were :
- Set to the last lock used (in this case "H+E back")
- No timer
- Give the keys to whoever has created that macro (that's me, in this case)
- Lock after one hour real time (meaning, no need to stay online the whole time)
- Block & Mouselook settings are unchanged
- The macro starts as soon as possible and does not wait for the restraints to be unlocked first
Easy enough. As complex as this plugin is, I have made it so the menu is always pretty self-explanatory so you don't get confused about some cryptic settings. It is important to know what you're doing, because you can make your program really sophisticated.
Macros ? Program ? Is there some hint of geekery here ? Probably so. This is exactly what it looks like, the Autolock is a way to program the restraint so it executes your instructions in the future. Instructions in this case are macros, and you can define up to 6 of them. Each macro will need the previous one to be executed before starting.
This is the most important bit about this plugin, so I will write it again in bold :
Macros are executed in sequence, not all at the same time.
So in order to have Macro nbr 2 start, you must wait until Macro nbr 1 has executed, i.e. its countdown has reached zero. There is a little subtlety here : you can set your macro to require the restraint to be unlocked on top of it (it doesn't by default).
In other words, you can set a macro so it starts either at the moment the previous macro is executed, or after it has been executed AND the restraint has been unlocked (which can be a while later).
A little drawing is worth a thousand words, so let me show you a good way to see it. Firstly, this is a macro :

As you can see, a macro has a part before it is executed, and a part after it is executed. The countdown runs until it reaches zero, then the macro is executed, and the wearer is locked afterwards. After a macro is executed, it is set to "Stopped" and the next one may begin counting down.
Actually whether the next macro begins counting down or not depends on its "While free" option. If that option is turned off, then it starts counting down immediately after the previous macro is executed (and the wearer is locked up). If it is turned off, it will wait until the restraint is unlocked before counting down, as indicated on this drawing :

With me so far ? This drawing is pretty easy to understand, you see the difference immediately. The starting point of the second macro depends on its own "While free" bit. Please note that the option is called "While free" and not "When free". This means that even if the macro has already started counting down, if the restraint is suddenly locked for other reasons, the countdown will be suspended until the restraint is unlocked, and only then will it be resumed.
So if you create several macros, some with "While free" set to "on" and others set to "off", you may end up with such a program :

On this drawing, Macros 2 and 4 are set to "While free OFF", while Macro 3 is set to "While free ON". For this example, we don't care about the "While free" setting of Macro 1, but we would if the wearer was locked during that time. You can see that if a macro is executed while the wearer is locked, the current lock is replaced by the new one.
Finally, each macro has an "Online" setting as well, which determines whether the countdown runs all the time or only while the user is online.

If the "Online" bit is set to "OFF", then the restraint will be locked as soon as the user logs on, provided the countdown has already reached zero. Autolock does not deduce the time spent offline from the timer to set, though.
Now that you know the theory behind the execution of macros, let's see what the rest of the buttons do.
Let's suppose I have created 6 macros, each one with a different lock but all of them with a 30 minute countdown. What does that give us ?
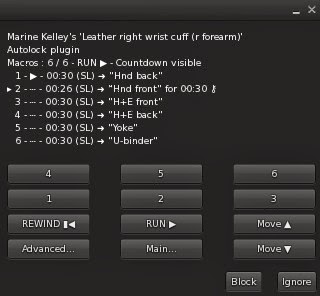
Wow, now we have a lot more information than we can handle, here. But you need to understand what you see so here is what it all means...
The text above the buttons is the list of macros with their status : "Running", "Paused", "Stopped", "Waiting for previous" and "Waiting for unlock".
- Running : The macro is currently running, only one macro may be running at any time.
- Paused : The currently running macro is paused because someone has pushed the "Run" button until it turned to "Pause", pausing the whole plugin.
- Stopped : The macro has already been executed (its countdown reached zero) and will not count down again until it is rewinded.
- Waiting for previous : The macro has a positive countdown but is not the one Running yet, it is waiting for its previous macro to be executed.
- Waiting for unlock : The macro is currently running but its "While free" bit is set to "ON" and the restraint is locked, so it has to be unlocked before the macro is resumed.
Before dwelling into each macro individually, let's see what each button does :
- + : This button lets you create a new macro, but only if there are no more than 5 already created.
- 1 to 6 : Pressing this button brings you to the pages of the corresponding macro, with its individual settings to be set.
- Rewind : Resets all the countdowns, effectively going back to the start. Exactly like rewinding a tape.
- Run/Loop/Pause : This button lets you run and pause the plugin, but also set it to "Loop", meaning that when the last macro is executed, it automatically rewinds the whole program back to the start.
- Move up and Move down : Moves the currently selected macro up or down in the list. The selected macro is the one you clicked on last, or the one you've just created, it is the macro which line starts with an arrow.
- Main... : Goes back to the main page of the restraint, like any plugin in the RR line.
- Advanced... : Leads to a page with more buttons to control the macros as a whole.
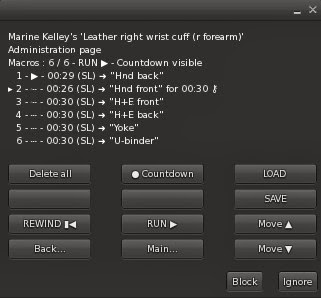
On this "advanced" page (which is really nothing more than "page 2" of the same controls, I was just lacking room on the menu, that's all), you find the same 6 lower buttons (except "Advanced..." which becomes "Back..." to return to the first page) and the following upper buttons :
- Delete all : Deletes all the macros. Careful, there is no confirmation and no undo.
- Countdown yes/no : When activated, the countdown says on the chat (heard only by the wearer) how much time is left. It does that 1 hour, then 30 minutes, 10 minutes, 5 minutes, 2 minutes and finally 1 minute before the next execution. When it is deactivated, the wearer would not get any info and will likely be taken completely by surprise.
- LOAD and SAVE : Allows the user to load and save a full program by copy and pasting messages on the chat. It is easy, one only has to follow the instructions given by the plugin at the moment they press those buttons.
Now that we've got all the main buttons covered, let's see how to set up an individual macro. Who said "it's about time" ? I understand that the introduction was long, but it was necessary to grasp the underlying design, and ultimately to know what you're doing when setting up an autolock.
I go back to the first page of the plugin and click on, say, "1" to edit the first macro.
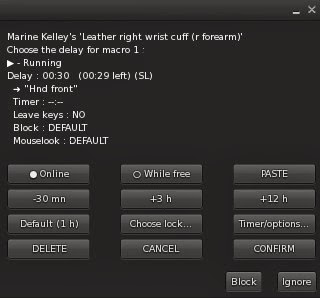
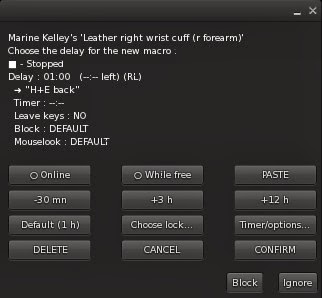
What you see on the text above the buttons is the full textual representation of the macro you are currently editing (whether it is new or already exists). For example, this one says :
> - Running : This macro is currently running, and will be executed when its countdown reaches zero.
Delay : 00:30 (00:28 left) (SL) : This is the countdown, both initial and current. The "(SL)" part means "online".
-> "Hnd front" : This is the lock the restraint will be set to once the macro executes.
Timer : --:-- : This is the timer the restraint will set once locked by this macro.
Leave keys : NO : The keys will be kept by whoever created that macro.
Block : DEFAULT : The "Block" setting (preventing from touching objects) will not change once locked.
Mouselook : DEFAULT : The "Mouselook" setting (being forced to first view) will not change once locked.
There are actually 3 pages of control to create and edit a macro. This is the first page, which allows you to change the delay (the countdown), to decide whether to count real time or online time only, to set the "While free" bit and to paste the last macro that had been created or edited (this is useful when creating a bunch of macros in a row, all with similar settings).
If you press the "-30 mn" button while it is already set to 30 minutes of delay, it goes down to 10 minutes only, which is the minimum.
The three buttons at the bottom allow you to decide what to do to the macro itself (and then brings you back to the main page) :
- DELETE : This will delete the macro.
- CANCEL : This will cancel all changes that you have done to the macro.
- CONFIRM : This will save the macro (and copy it for the next time you press "PASTE" on another macro), creating it if it didn't exist before.
When you press "Choose lock..." you are brought to the second page, the page that lets you choose the lock to be applied. It is pretty straightforward here :
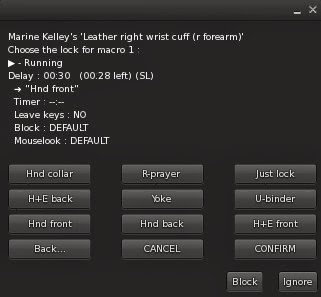
Each button is a lock as defined by the restraint, and the "Just lock" button will do exactly what it says : it will lock without a pose. Press "Back..." to return to the first page.
When you press "Timer/options..." you are brought to the third page, where you can set a timer and some options :
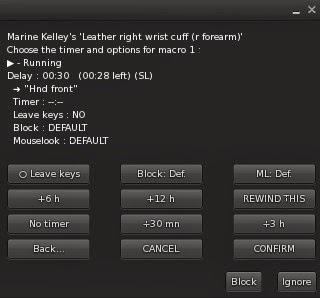
On this page you can choose to make the macro leave the keys on the restraint (don't forget to set a timer, then, or the wearer will be able to free herself), or keep them. You can decide whether the victim is to be Blocked (i.e. prevented from touching anything) and/or "Mouselooked" (i.e. forced to stay in first view). Block and Mouselook have an effect only with arms restraints, just so you know.
You can also rewind the macro, which means setting its current countdown to its initial one, and of course you can decide the timer to set once locked.
There are a handful of subtleties to keep in mind, when using the Autolock. Nothing bad, but things that could surprise you if nobody explains them to you :
- By default, the lock will be the one that was chosen last at the time of the creation of the macro (not of its confirmation).
- When you want the macro to keep the keys, they go to the creator of the macro only if they were on the restraint at the time of its execution. Otherwise they stay in the possession of whoever had them at the time, to avoid surprising them by snatching the keys from their hands.
- Changing the delay and confirming rewinds the macro.
- If you choose to run the Autolock in a loop, keep in mind that this will drive the sub crazy, and possibly get her stuck into an endless loop of bondage because the restraint will keep relocking itself without giving her a chance to struggle out. This may be what you want though !
- You can't set an exact RL schedule with the Autolock, since it waits until the sub logs on before firing its locks. This is due to the fact that the timer to set does not decrease even if the sub was offline at the time when the restraint was supposed to be locked.
- If your restraint does not have keys, like ropes, blindfolds and tape, some terms will change from "lock" to "tie", but the way to use it is strictly the same.
- Last but not least, there seems to be a known issue when using the Autolock for the first time with "online" off. Apparently it will lock right away. It will do that only once though. I will work on that later and see if I can come up with a solution.
Whew ! That's pretty much it. I'm sorry if this tutorial was long-winded, but this is a complex plugin and many things needed to be explained.
I hope you'll have fun with the Autolock !
Marine
You have already heard about normal keys, RealKeys (I hope), release timers, long timers, RL timers etc etc... yes that's beginning to be a lot of concepts to learn. The Autolock uses all these concepts and more, so this is complex stuff. Very few people grasp all its subtleties, so don't be ashamed if you master only 25% of its capabilities. Bear with me, this tutorial is going to be very long.
Please note that this is the second version of the Autolock plugin, this one is a complete rewrite and has been introduced in v1.24 of the RR products. You can find the tutorial for the old version here.
There are multiple purposes to this plugin : you could want to program your bottom's restraints to automatically lock themselves after a while while she's wandering around, or you could want to make her already tight bondage vary a little over time, or you could want to make her struggles even more difficult by regularly re-locking her restraints even when you are not around... It's quite versatile.
Before we start explaining what this plugin is all about, let's take a look at its menus first. I click on my Vixen cuffs and I go to "Plugins..." > "Autolock..." :
What you see is the (currently empty) list of "macros" to be run by the Autolock. But as written on the top of the menu, "Macros : 0 / 6" so... not much is going to happen here until I do something about it.
But what is a macro ? Does it have something to do with Word or Excel macros ? As a matter of fact, it does, loosely. A macro is simply a programmed lock with a delay (when to lock), a level (which lock to choose), a timer (how long will it stay locked that way) and other options (will the keys be left or taken, will it start counting now or when the restraint is unlocked, stuff like that).
Ok this is all too theoretical so how about an example ? Let's do this. I click on the big "+" button on the upper right corner, and I get this menu :
Whoa. What is all this ? There sure is a lot of information in there. Where to begin ?
In fact we are not going to review it now, let's just press "CONFIRM" and see what happens.
Ok this is interesting : the menu shows me there is a macro in the list, that it is running, there is some kind of countdown that shows "01:00 (RL)" and that it will lock to "H+E back", which is the lock that was used last on these cuffs. Oh, and the chat says :
[01:26] Leather right wrist cuff (r forearm): : Device autolocking in 1 hour.
Ok, fine, one hour it is. I'll wait...
*Files her nails*
*Watches TV*
[02:56] Leather right wrist cuff (r forearm): : Device autolocking in 30 minutes.
*Pays no attention to the chat*
*Goes shopping*
*Falls in love with shoes*
[02:16] Leather right wrist cuff (r forearm): : Device autolocking in 10 minutes.
*Still pays no attention to the chat*
*Goes shopping some more*
[02:21] Leather right wrist cuff (r forearm): : Device autolocking in 5 minutes.
[02:24] Leather right wrist cuff (r forearm): : Device autolocking in 2 minutes.
[02:25] Leather right wrist cuff (r forearm): : Device autolocking in 1 minute. Last warning, get ready...
Suddenly I am stopped dead in my tracks by a familiar noise and my arms are rudely cuffed behind my back in front of everyone.
[02:26] Leather right wrist cuff (r forearm): Marine's Leather right wrist cuff (r forearm) automatic lock triggered
[02:26] Leather right wrist cuff (r forearm): Marine has been locked by Marine ("H+E back").
[02:26] Leather right wrist cuff (r forearm): Marine's Leather right wrist cuff (r forearm) automatic lock triggered
Executing macro 1/1
Type : H+E back
Timer : --:--
Keys taken
Block : DEFAULT
Mouselook : DEFAULT
Who the hell... Oh I understand, I was so busy I completely forgot about that autolock and now I'm stuck ! Ok, ok, it's not that bad, I still have my own keys and no timer is set, so I can unlock myself, which I do now.
Then I take a look at the Autolock menu again, and... oh this is interesting :
The menu shows me the macro, but it is now "stopped" (I can tell from the big square icon on its line). Does this mean it won't trigger anymore ?
Ok, so let's review what happened here during this quick example.
The macro that was created had default settings since I hit "CONFIRM" without changing anything. These default settings were :
- Set to the last lock used (in this case "H+E back")
- No timer
- Give the keys to whoever has created that macro (that's me, in this case)
- Lock after one hour real time (meaning, no need to stay online the whole time)
- Block & Mouselook settings are unchanged
- The macro starts as soon as possible and does not wait for the restraints to be unlocked first
Easy enough. As complex as this plugin is, I have made it so the menu is always pretty self-explanatory so you don't get confused about some cryptic settings. It is important to know what you're doing, because you can make your program really sophisticated.
Macros ? Program ? Is there some hint of geekery here ? Probably so. This is exactly what it looks like, the Autolock is a way to program the restraint so it executes your instructions in the future. Instructions in this case are macros, and you can define up to 6 of them. Each macro will need the previous one to be executed before starting.
This is the most important bit about this plugin, so I will write it again in bold :
Macros are executed in sequence, not all at the same time.
So in order to have Macro nbr 2 start, you must wait until Macro nbr 1 has executed, i.e. its countdown has reached zero. There is a little subtlety here : you can set your macro to require the restraint to be unlocked on top of it (it doesn't by default).
In other words, you can set a macro so it starts either at the moment the previous macro is executed, or after it has been executed AND the restraint has been unlocked (which can be a while later).
A little drawing is worth a thousand words, so let me show you a good way to see it. Firstly, this is a macro :
As you can see, a macro has a part before it is executed, and a part after it is executed. The countdown runs until it reaches zero, then the macro is executed, and the wearer is locked afterwards. After a macro is executed, it is set to "Stopped" and the next one may begin counting down.
Actually whether the next macro begins counting down or not depends on its "While free" option. If that option is turned off, then it starts counting down immediately after the previous macro is executed (and the wearer is locked up). If it is turned off, it will wait until the restraint is unlocked before counting down, as indicated on this drawing :
With me so far ? This drawing is pretty easy to understand, you see the difference immediately. The starting point of the second macro depends on its own "While free" bit. Please note that the option is called "While free" and not "When free". This means that even if the macro has already started counting down, if the restraint is suddenly locked for other reasons, the countdown will be suspended until the restraint is unlocked, and only then will it be resumed.
So if you create several macros, some with "While free" set to "on" and others set to "off", you may end up with such a program :
On this drawing, Macros 2 and 4 are set to "While free OFF", while Macro 3 is set to "While free ON". For this example, we don't care about the "While free" setting of Macro 1, but we would if the wearer was locked during that time. You can see that if a macro is executed while the wearer is locked, the current lock is replaced by the new one.
Finally, each macro has an "Online" setting as well, which determines whether the countdown runs all the time or only while the user is online.
If the "Online" bit is set to "OFF", then the restraint will be locked as soon as the user logs on, provided the countdown has already reached zero. Autolock does not deduce the time spent offline from the timer to set, though.
Now that you know the theory behind the execution of macros, let's see what the rest of the buttons do.
Let's suppose I have created 6 macros, each one with a different lock but all of them with a 30 minute countdown. What does that give us ?
Wow, now we have a lot more information than we can handle, here. But you need to understand what you see so here is what it all means...
The text above the buttons is the list of macros with their status : "Running", "Paused", "Stopped", "Waiting for previous" and "Waiting for unlock".
- Running : The macro is currently running, only one macro may be running at any time.
- Paused : The currently running macro is paused because someone has pushed the "Run" button until it turned to "Pause", pausing the whole plugin.
- Stopped : The macro has already been executed (its countdown reached zero) and will not count down again until it is rewinded.
- Waiting for previous : The macro has a positive countdown but is not the one Running yet, it is waiting for its previous macro to be executed.
- Waiting for unlock : The macro is currently running but its "While free" bit is set to "ON" and the restraint is locked, so it has to be unlocked before the macro is resumed.
Before dwelling into each macro individually, let's see what each button does :
- + : This button lets you create a new macro, but only if there are no more than 5 already created.
- 1 to 6 : Pressing this button brings you to the pages of the corresponding macro, with its individual settings to be set.
- Rewind : Resets all the countdowns, effectively going back to the start. Exactly like rewinding a tape.
- Run/Loop/Pause : This button lets you run and pause the plugin, but also set it to "Loop", meaning that when the last macro is executed, it automatically rewinds the whole program back to the start.
- Move up and Move down : Moves the currently selected macro up or down in the list. The selected macro is the one you clicked on last, or the one you've just created, it is the macro which line starts with an arrow.
- Main... : Goes back to the main page of the restraint, like any plugin in the RR line.
- Advanced... : Leads to a page with more buttons to control the macros as a whole.
On this "advanced" page (which is really nothing more than "page 2" of the same controls, I was just lacking room on the menu, that's all), you find the same 6 lower buttons (except "Advanced..." which becomes "Back..." to return to the first page) and the following upper buttons :
- Delete all : Deletes all the macros. Careful, there is no confirmation and no undo.
- Countdown yes/no : When activated, the countdown says on the chat (heard only by the wearer) how much time is left. It does that 1 hour, then 30 minutes, 10 minutes, 5 minutes, 2 minutes and finally 1 minute before the next execution. When it is deactivated, the wearer would not get any info and will likely be taken completely by surprise.
- LOAD and SAVE : Allows the user to load and save a full program by copy and pasting messages on the chat. It is easy, one only has to follow the instructions given by the plugin at the moment they press those buttons.
Now that we've got all the main buttons covered, let's see how to set up an individual macro. Who said "it's about time" ? I understand that the introduction was long, but it was necessary to grasp the underlying design, and ultimately to know what you're doing when setting up an autolock.
I go back to the first page of the plugin and click on, say, "1" to edit the first macro.
What you see on the text above the buttons is the full textual representation of the macro you are currently editing (whether it is new or already exists). For example, this one says :
> - Running : This macro is currently running, and will be executed when its countdown reaches zero.
Delay : 00:30 (00:28 left) (SL) : This is the countdown, both initial and current. The "(SL)" part means "online".
-> "Hnd front" : This is the lock the restraint will be set to once the macro executes.
Timer : --:-- : This is the timer the restraint will set once locked by this macro.
Leave keys : NO : The keys will be kept by whoever created that macro.
Block : DEFAULT : The "Block" setting (preventing from touching objects) will not change once locked.
Mouselook : DEFAULT : The "Mouselook" setting (being forced to first view) will not change once locked.
There are actually 3 pages of control to create and edit a macro. This is the first page, which allows you to change the delay (the countdown), to decide whether to count real time or online time only, to set the "While free" bit and to paste the last macro that had been created or edited (this is useful when creating a bunch of macros in a row, all with similar settings).
If you press the "-30 mn" button while it is already set to 30 minutes of delay, it goes down to 10 minutes only, which is the minimum.
The three buttons at the bottom allow you to decide what to do to the macro itself (and then brings you back to the main page) :
- DELETE : This will delete the macro.
- CANCEL : This will cancel all changes that you have done to the macro.
- CONFIRM : This will save the macro (and copy it for the next time you press "PASTE" on another macro), creating it if it didn't exist before.
When you press "Choose lock..." you are brought to the second page, the page that lets you choose the lock to be applied. It is pretty straightforward here :
Each button is a lock as defined by the restraint, and the "Just lock" button will do exactly what it says : it will lock without a pose. Press "Back..." to return to the first page.
When you press "Timer/options..." you are brought to the third page, where you can set a timer and some options :
On this page you can choose to make the macro leave the keys on the restraint (don't forget to set a timer, then, or the wearer will be able to free herself), or keep them. You can decide whether the victim is to be Blocked (i.e. prevented from touching anything) and/or "Mouselooked" (i.e. forced to stay in first view). Block and Mouselook have an effect only with arms restraints, just so you know.
You can also rewind the macro, which means setting its current countdown to its initial one, and of course you can decide the timer to set once locked.
There are a handful of subtleties to keep in mind, when using the Autolock. Nothing bad, but things that could surprise you if nobody explains them to you :
- By default, the lock will be the one that was chosen last at the time of the creation of the macro (not of its confirmation).
- When you want the macro to keep the keys, they go to the creator of the macro only if they were on the restraint at the time of its execution. Otherwise they stay in the possession of whoever had them at the time, to avoid surprising them by snatching the keys from their hands.
- Changing the delay and confirming rewinds the macro.
- If you choose to run the Autolock in a loop, keep in mind that this will drive the sub crazy, and possibly get her stuck into an endless loop of bondage because the restraint will keep relocking itself without giving her a chance to struggle out. This may be what you want though !
- You can't set an exact RL schedule with the Autolock, since it waits until the sub logs on before firing its locks. This is due to the fact that the timer to set does not decrease even if the sub was offline at the time when the restraint was supposed to be locked.
- If your restraint does not have keys, like ropes, blindfolds and tape, some terms will change from "lock" to "tie", but the way to use it is strictly the same.
- Last but not least, there seems to be a known issue when using the Autolock for the first time with "online" off. Apparently it will lock right away. It will do that only once though. I will work on that later and see if I can come up with a solution.
Whew ! That's pretty much it. I'm sorry if this tutorial was long-winded, but this is a complex plugin and many things needed to be explained.
I hope you'll have fun with the Autolock !
Marine
Wednesday, February 12, 2014
RealRestraint update to v1.24
Hello there !
I've been very, very, very busy lately, working on the upcoming update to v1.24 of all the RealRestraint products.
Actually, 1.24 is a misnomer, it should have been 1.30, considering the number of changes. But this is just a number, don't mind it. It's just that at first it looked just like a new iteration... one year ago. I've been working on this update for quite a while in the background, some of the "new features" are in fact at least that old. But some bugs needed fixing before releasing that update, and I figured out the fixes only recently.
I wouldn't normally write a full blog post for release notes, which belong to the updater. But this time this is so big that I think it deserves both a blog post and pictures.
But first things first, you must be thinking "Oh no, not another update to RR, I will have to resize all my stuff again !". Not this time ! I have created a couple scripts that will save you hours of frustration : "Copy Shape" and "Paste Shape". I have written a tutorial just to explain how to use those scripts, which you can find here :
http://realrestraint.blogspot.com/2014/02/copy-shape-paste-shape-scripts.html
In short, you put the "Copy Shape" script inside the original piece of equipment you have just updated, and the "Paste Shape" script inside the new one, and you let the scripts do the job. And if you had tweaked some prims individually on the original object, the scripts will let you copy the tweaking just by clicking. It's easy, you'll see.
Now that we've got this out of the way, let's take a look at the main focus of this update :
I hope this was good enough an appetizer... let's see the complete list now.
Bug fixes in the legs restraints
Autolock V2
Completely rewritten the Autolock plugin :
Wriggle V2
Completely rewritten the Wriggle plugin :
Anim plugin and its HUD
Lockable/Unlockable (the main script for every restraint)
Animations

Various
Have fun !
Marine
I've been very, very, very busy lately, working on the upcoming update to v1.24 of all the RealRestraint products.
Actually, 1.24 is a misnomer, it should have been 1.30, considering the number of changes. But this is just a number, don't mind it. It's just that at first it looked just like a new iteration... one year ago. I've been working on this update for quite a while in the background, some of the "new features" are in fact at least that old. But some bugs needed fixing before releasing that update, and I figured out the fixes only recently.
I wouldn't normally write a full blog post for release notes, which belong to the updater. But this time this is so big that I think it deserves both a blog post and pictures.
But first things first, you must be thinking "Oh no, not another update to RR, I will have to resize all my stuff again !". Not this time ! I have created a couple scripts that will save you hours of frustration : "Copy Shape" and "Paste Shape". I have written a tutorial just to explain how to use those scripts, which you can find here :
http://realrestraint.blogspot.com/2014/02/copy-shape-paste-shape-scripts.html
In short, you put the "Copy Shape" script inside the original piece of equipment you have just updated, and the "Paste Shape" script inside the new one, and you let the scripts do the job. And if you had tweaked some prims individually on the original object, the scripts will let you copy the tweaking just by clicking. It's easy, you'll see.
Now that we've got this out of the way, let's take a look at the main focus of this update :
- New Autolock plugin : I have completely rewritten the old Autolock plugin to make it clearer, easier to use and more powerful, and of course more devious.
- New Wriggle plugin : I have rewritten that one too because nobody was ever using it, since it was unclear and too difficult. Its purpose is to let the bottom switch a restraint from one lock to another, like from standing with the legs tied together to laying down with the legs tied the same way, and back. Or switching the hands from back to front. Or kneeling to hogtie, etc.
- Reworked the Anim plugin so it is more useful and more powerful, and merged the two RR Anim HUDs into one.
- Added the ability to run while in bondage.
- Added and re-organized poses in the restraints
- Re-added "hands to collar" and "r-prayer" to the Restrained Elegance cuffs. Also added them to the Vixen cuffs in the process. This was a popular request.
- Added a body harness chain for the 3rd lock of the Restrained Elegance cuffs, exactly like the one in the Vixen leather set.
- And many bug fixes and improvements.
I hope this was good enough an appetizer... let's see the complete list now.
Bug fixes in the legs restraints
- Sometimes when the legs are locked, we could only move backwards until the restraint was unlocked, unworn, worn again and locked again, or until a relog. This was due to a race condition and this bug was the actual blocker for this update. I'm glad it is sorted out now.
- Added a way to run and jump even when the legs are bound, but not too tight.
- When "Autoref" is off, the legs restraint will now not allow moving at all. This is useful when wearing two different legs restraints, only one should allow moving.
Autolock V2
Completely rewritten the Autolock plugin :
- Made it easy and fast to use as well as intuitive.
- Up to 6 macros (a macro is a programmed lock) to be executed sequentially.
- Ability to save and load macros.
- Each macro can start either when the previous one is executed, or when the restraint is unlocked, allowing for fine-control of the timing.
- The macros can be made to loop, sticking the bottom into an endless loop of bondage. Be careful, this could prevent her from struggling out altogether !
- The current tutorial for the Autolock plugin is now out-of-date, it will be updated soon.
Wriggle V2
Completely rewritten the Wriggle plugin :
- Made it easier to understand and use.
- When bound, you just choose which lock you want to switch to, if any (it is made to be realistic, you can only switch to another lock if it makes sense to do so, for example moving the cuffed hands from the back to the front, or laying down on the floor while being up on the feet with the legs bound).
- Each attempt makes you look like you're struggling, when applicable.
- You must score several successes to go to that lock, each attempt has a percentage of success and costs energy (the very energy you use to struggle out).
- The more restraints you wear, the more difficult it gets (it's easier to try to stand up from a lying position when your hands are cuffed together than when they are in a yoke, for example).
- You lose all your progress if you move.
- When successful, the lock changes but not the progress in struggling out, if any. Likewise, if you were tied up in the "Lie" lock and later used wriggle to switch to "Tight" to stand up, struggling out will retain the difficulty of the "Lie" lock.
- The current tutorial for the Wriggle plugin is now out-of-date, it will be updated soon.
Anim plugin and its HUD
- Merged both identical HUDs into one, and added a button to switch between arms and legs restraints.
- Added buttons to control the pose more finely : you can go one step, two steps and three steps back and forth, but also back to the first pose or go to the pose halfway down the list.
- Fixed a bug where going back to the first pose on a restraint with "Autoref" off would set its cycle time to 30 seconds.
- Changed the interface in the plugin to give you the ability to choose the pose directly.
- When switching to a pose, show its name in the chat history (only to the owner of course).
- When "Autoref" is off on a restraint, its Anim plugin will ignore all commands until "Autoref" is switched back on (it can be controlled in the "More..." menu of the restraint).
- Made room for memory in both the plugin and the HUD.
- See http://realrestraint.blogspot.com/2014/02/rr-tutorial-anim-plugin-v3.html for details.
Lockable/Unlockable (the main script for every restraint)
- Show the display names instead of the user names.
- Show the energy left on the menu.
Animations
- Made a new, better-looking Taut walk for the legs restraints.
- Made run animations for the Taut and Hobble poses in the legs restraints.
- Re-added "R-prayer" and "Hands med" (hands chained to the collar) to the Restrained Elegance arms cuffs, like before.
- Added those two poses to the Vixen cuffs as well.
- Added the hands-to-collar poses to the first lock of the Restrained Elegance cuffs and the Vixen cuffs.
- Added a "kneel bundle" pose to the legs restraints.
- Added a body harness chain to the Restrained Elegance cuffs, exactly like that of the Vixen, for the 3rd lock (elbows chained back and hands chained in front).
- Added an "elbows only" lock to the arms straps.
- Added "lie" poses to the Hobble and Taut locks in all the legs restraints, so you can lie down when in these locks (since it is trivial to go from standing to lying when the ankles are no tied together, no need to use the Wriggle plugin for that).
- Organized a few animations better in the restraints, in particular the hogties.
Various
- Gags : added the necessary scripts to make them compatible with the Happy Spanker from Marine's Goodies.
- Isolation hood : removed the invisiprims and added an alpha layer instead.
- Gags : changed the defaults to be a little more user-friendlier (in particular, don't throttle the emotes by default), and allow OOC chat ("((...))") without being accused of cheating.
- Sit plugin : Removed the "no stand" restriction automatically when unlocked. This was confusing subs big time and could put them in awkward situations.
- Vibrators for the Siren ropes : they did not remove their listeners after saying something on channel 0 when choosing a custom tint.
- Renamed the Vibrators to "XXX's vibrator" to avoid confusion.
- When saying a custom tint on channel 0 to a vibrator and to the SirenTex plugin, allow these two formats : three floats from 0.0 to 1.0 or three integers from 0 to 255.
- Outfit plugin : made the "Attach" button behave like "Attach over".
- Scarf blindfold : Replaced the main script Lockable with Unlockable, to act like ropes (this was done the other way before because that blindfold was created before the Shibari ropes, so the script "Unlockable", which is used in ropes, didn't exist at the time).
- Siren & Shibari ropes : made the texture plugins available to the sub as well. I know this is not very realistic (when you're bound in ropes, you shouldn't be able to suddenly change their color), but a lot of tops are sloppy or ignorant of this feature, so they don't bother matching the ropes to make the sub look good. And looking good is half the fun when in bondage !
- Police handcuffs : now only the wrist cuffs show when simply "locked", and not the elbow cuffs.
- Harmonized all the RLV plugins (Allow, Control, Outfit, Sit, Touch, Unwear, Wear) so that they are now contained into all collars and wrist restraints, to avoid confusion.
- Made those RLV plugins handle 8 locks instead of 6.
- Jammer : Made it say display names on the chat instead of user names.
- Jammer Remote : Made it add "Resident" after the name of the target when forgotten.
- RR HUD : Sometimes it wouldn't work in no-script areas.
- Made it so a restraint wouldn't poll for its RR HUD when detached (it would spam the user when further than 10 m away otherwise).
Have fun !
Marine
RR Tutorial : Anim plugin v3
Hello there,
Please note : I have made significant changes to the Anim plugin, so the tutorial needed to be updated as well. This is the new version, you can find the old version of this tutorial here and here.
This is a tutorial meant to show you how to use the new Anim plugin, that is meant to replace the old ForceAnim script. Although the plugin is complex, its use is simple and very close to what you are already used to : controlling your own Animation Overrider.
Until now, my restraints were providing at most 6 animations per product, and sometimes it would feel a bit cramped in there. For example, many people have been asking for a Kneel animation in the Vixen cuffs, but tough luck, there was no room for it.
Moreso, one would have liked to be able to lie down or sit down while standing straight with her legs tied, and couldn't because it was another lock, and so on. Or her hands would clip through her butt because her AO would make her stand in a way that her chest perks forward and her butt perks back (I don't know about yours, but mine does that).
Enough of that ! After months of working on my stuff, I have turned nearly all my restraints into the equivalent of an Animation Overrider, by replacing the old ForceAnim script with the new Anim plugin, giving you, the user, the ability to control it easily and make your bondage more enjoyable, life-like and sexy !
I won't write long pages of explanation... I am simply going to give you an example and show you enough to make you want to experiment !
The basics
I am now wearing my Siren ropes, which contain this new "Anim" plugin. I click on the arms ropes (remember, they are invisible while untied, so I need to press Ctrl-Alt-T to see them) :

Here is the menu I get :

I go to "Plugins...", "Anim...", and here is what I see :
Now, this menu is useless right now, because my ropes are not tied yet. But it will be filled with animations once I'm put into a proper tie, and this is what will allow me to select exactly the animation I want. But you know what ? I'm not going to use this menu much, unless there are a lot of animations and I know exactly the name of the one I want. Usually, I will use a HUD instead, and that HUD is included in the box of every RealRestraint product that ties either your arms or your legs. Its name is "RR Anim HUD (top left)".

So I wear this item and here is what it looks like :

Now, what are all those buttons ? What do they do ? There is only one way to know ! I tie myself up in the arms ropes with the "Arms tight" button.
Nothing new here, I'm tied up. The ropes play an animation for my arms, and whatever I do I can't stop it.

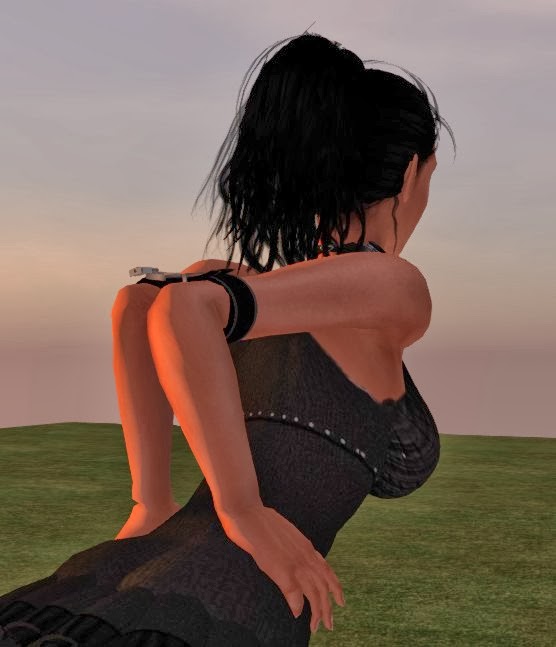
Let's see what this AO can do. I press the upper right arrow on the HUD... and my arms move up a little ! One more press, they move further up, and up, up, up...


Ok this is a bit much, but can be useful when tied into a strappado, like this :

I keep pressing that button, and eventually my arms are folded behind my back, making it easier for... uh... spankings...

Ok, that's all for the arms. I didn't show much, but that's good enough for an introduction. Now let's switch to the legs.
Same thing, I click on them and I get this :

Let's try "Hobble" :

Teehee. That looks embarrassing. I can walk around, or rather hobble around, but how about clicking on that yellow arrow again ? I do it and... darn, it moves my arms only, not my legs. How can I control my legs with that HUD ? It seems to only control the arms !
Easy, by clicking on the big hand icon at the top of the HUD :


It doesn't take a genius to understand what this means. This icon indicates what the HUD currently controls : the arms restraints or the legs restraints. If I click again, it goes back to the hand icon.
Now, I click on the right yellow arrow of the lower HUD, and this happens :

I'm standing straight now.
I click again :

Leaning forward a bit.
And again :

And a few more times :

I keep clicking, getting variations of those poses (sitting right, sitting straight...). Eventually I come back to the first pose.
Whew ! This exercise made me sweaty ! I better get some rest... here, this wall will be perfect.

Hehe. All I did was stand back to the wall, and choose the last pose, which is the same as the 1st one but leaning back a bit. I always wanted to be able to use the environment to make my bondage more interesting and life-like. I can also do that while sitting on the ground, with my legs straight or knees a bit flexed.
Now, depending on the pose I'm in, my walk changes as well to accommodate. If I'm standing, I will hobble. If my legs are tied tightly together, I will hop. If I'm sitting or kneeling, I will scoot on my butt. If I'm laying, I will crawl. And so on. This makes it look so much more natural !
Sitting down in bondage
Alright, let's rest a bit more, these heels are killing me. I'd like to find a prim to sit on. What do you mean I can't sit down because my legs are tied ? Pfft. That was before !
I hobble my way to a comfy-looking plywood prim...

... and I sit on it.

What the hell ? I look like I'm standing with my legs going through the cube and even the ground... What can I do ?
Easy. The HUD allows me to actually tweak the sitting pose in many ways so that I am practically sure to find one suited for my current position. So I do this, I click on the upper right arrow of the lower HUD (the one for the legs) until I am satisfied with the sitting pose :

There, my legs are still tied the way they were, but they are folded now. I can use the arrows to choose the pose, and that's where the new version of the Anim plugin really shines. I have optimized it so it can handle many more animations, in particular many sitting poses. I had always been bothered by the fact that you had to have your legs restraints unlocked when sitting on an object that plays an animation (a rack, a chair, a bed...). It would totally kill the feeling of helplessness. This was due to a SL limitation with animations. That limitation still exists of course, but I have overcome it by making many variations of the base poses, this allows you to sit almost anywhere while still being bound. You don't believe me ? Let's take a look.
First I need to find a bed or a couch... Damn, there is none around here, since this place is made for working, I have overlooked its furnishing. Sorry ! It's okay, let me teleport to another place...

There we go. This is a playroom of mine I go to often, it is filled to the brim with top-of-the-line stuff. Here I will be able to show you what I mean by "being able to sit almost anywhere".
Let's see here... "Exec Chair v1.20.1 - LP" by Misao Nakamura. Comfy, good animations, and wicked. We'll start easy.

I sit on it...

Not really impressive so far, my legs are clipping through the seat... I click on the upper right arrow :

There is a little improvement, my knees are bent slightly. Still clipping, though. I click again :

Oookaaay... This is going to take a while. I click again. And again, and again and again and again until my thighs finally move. For this particular tie, it actually takes 6 more clicks.

Interesting, now my thighs are correctly placed, but my knees are straight again. Maybe if I keep clicking on the right arrow, I'll find a pose that suits me...

This is the 15th pose. Whew ! It took a while but I finally found a pose for my legs that goes well with that chair.
Oh, I know what you're thinking. That's WAY too many clicks, and I agree with you. But worry not, the HUD will help you there.
Have you noticed how many arrows this HUD has ? Until now I have clicked only on the upper right arrow, now is the time to explain what the others do.


The two curvy arrows on the fourth row are very useful in every situation, they jump to the next "group" of animations, or to the first animation of the current one, or to first animation of the previous group if you are already on the first one of the current group.


The last two arrows on the fifth row are equally useful. The left one brings you back to the first pose immediately, while the right one brings you to the first pose of the second half of the list (if there are 20 poses in the current lock, that means the 11th one). Why not to the last one ? Because that would be of little use since you can reach it just by going to the first one then clicking on the left arrow. The first pose of the second half of the list is as far of the first pose as you get, in both directions, so that's the jump that would save you the most clicks.

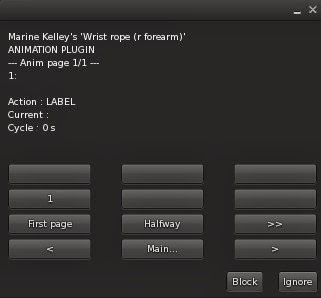
Finally, you can select the pose directly by clicking on the Menu button, which brings this menu when tied up :
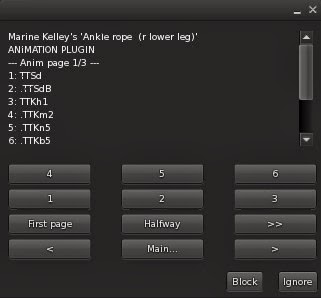
Each number is a pose, you can go to the first page, to the next page, or two pages ahead, or back, or to the first page of the second part of the list by clicking on "Halfway". For example, if there are 8 pages, it brings you to page 5. Like the
button, "Halfway" brings you as far of the first page as possible (since the arrows wrap around, so the 6th page is actually closer to the first one on a 8-page list than the 5th one, because you can wrap back).The name of the poses may be cryptic... Let me explain some of the syntax quickly.
Firstly, if the name begins with a dot ("."), then the pose is part of a group and will be jumped over by the "next group" and "previous group" buttons of the HUD.
The first two letters usually stand for the lock the pose is used in :
- "TT" for "Tight"
- "HL" for "Hobble"
- "HB for "Hands Back"
- "HG" for "Hogtie"
- etc
The following part is what the pose is about :
- "Kh" for "Kneel high"
- "Km" for "Kneel medium"
- "Kn" for "Kneel" (low)
- "Kb" for "Kneel bundle"
- "Sd" for "Stand"
- "Si" for "Sit"
- The "w" part means "wall"
The following letter, if any ("B", "C", "D"...) stands for the variation. Usually "L" for "Left" and "R" for "Right".
Lastly, the number is the offset to apply, when the pose is not standing.
Confused about the groups ? Let me illustrate all this with an example and you'll understand. While I was sitting and playing with the arrows, you noticed that my knees were moved first, and then my thighs. My knees moved back 8 times, then my thighs moved back once, then I could move my knees back 8 times again before my thighs would move again, and so on. This is where "groups" are useful : every position for my thighs is a "group", containing all the possible angles for my knees. In other words, "jumping to the next group" simply means moving my thighs once, putting my knees into the straight position again. Let me show you. Groups apply not only to sitting poses but also to standing ones, both for the arms and the legs. They are simply a way to organize the animations better. For example, if I'm standing with my legs tied, the next group would bring me to my knees, then down to sitting on my butt. That's two clicks, whereas I've been actually going over 8 or 9 poses. But back to our example.
Right now I'm sitting corrrectly, but what if I want my thighs higher and my knees folded, like curved in a ball on the chair ? Easy, I click on the right curvy arrow 3 times to put my thighs high in the air, close to my chest :
Then twice on the 3-step right arrow to bend the knees close to the thighs :
Then once on the upper right arrow :

Bingo ! I'm now sitting curled on my chair exactly like I wanted !
I actually took the long way to show you how it all works, but let's do it again my way now. I click on the left button of the 4th row, the one that looks like an arrow pointing to the left with a bar on its left :
Back to the first pose, with my legs straight and clipping through.
I click on the "previous group" button, which moves my legs back (it is useful in some situations, for example when you are lying on your belly but your pelvis is rotated up, making your legs poke through the furniture).

Now I click on the "previous pose" button to go to the last pose of the previous group, since the "previous group" button I just pressed took me to the first pose of the last group in the list (you may want to read that sentence twice, I know it is a little complex).
Oh ! I was all about ajusting my legs, but what about my arms ? You know what ? Same solution. Except the arms have much fewer poses than the legs when it comes to sitting, but they are organized in groups too. So I simply switch back to the arms by clicking on the big foot button, then I click on the "first pose" button, then back twice, and I'm good.


If you really want to know what those curious names are all about in the legs restraints ("tAA", ".tCB", ".tDD" etc), here is an explanation.
The "t" stands for "tight", which means "legs tied together". In the case of Hobble, some poses begin with "w", which means "wide".
The second letter indicates the angle of the thighs :
- "A" is straight
- "B" means "30° forward"
- "C" means "60° forward"
- "D" means "90° forward" (straight angle)
- "E" means "120° forward"
- "F" means "150° forward"
- "Z" means "30° back"
The third letter indicates the angle of the shins relative to the thighs, with the exact same values (except there is no "Z" because that would look weird).
The dot at the beginning of some (but not all) animations means "part of a group", which means those animations will be "jumped over" by the and buttons. In the case of the sitting poses, every pose which last letter is not "A" (shins aligned straight with the thighs) is part of a group. This is why pressing on one of those buttons will move the thighs.
and buttons. In the case of the sitting poses, every pose which last letter is not "A" (shins aligned straight with the thighs) is part of a group. This is why pressing on one of those buttons will move the thighs.
Knowing this will help you find the right pose you want by using the menu of the Anim Plugin itself directly.
Now, let me demonstrate a few more situations. I won't go into detail again, you have understood the principle already. I will only tell you the buttons I press, and the result I obtain, to show that you can actually sit anywhere without ever having to be unbound.
This chair is comfy, but no way I'm going to work on my computer right now, not in that bondage ! I'll take a rest instead.
I choose the "Slouch" sit pose of this chair (that's an animation contained in the chair, not in the ropes), I make sure my HUD commands the legs by pressing the hand button to switch to a foot if needed, then I press
, and my legs are straight again. Now I press then , and I'm in a pose that looks good in five clicks :
Oh and my arms are clipping through the armchair now. No problem, I click on the foot icon to go back to controlling the hands, then
, and they're out of the way.
Enough slouching in the chair now, I need to show you more !
I stand up, and immediately I find myself bending over... This is normal, I went so far into the sitting poses that, because of the synchronization, I went beyond the number of standing poses available, so it chose the last one. I click on
to correct that. Same for the arms, and I'm back to normal in three clicks.Now, I want to use the bed on the other side of the room. There are a few poses that are very interesting for the matter at hand. Let's begin with the pose named "Petition", which I believe is a prayer :

I tie myself up again, press
for both the arms and legs to put myself in the first pose :
I select the legs, then I click
, then and bingo, I am now kneeling down again but in proper bondage this time :
One more example now, there is a piece of BDSM equipment named "BH bondage hook RLV" by Britt Halberstam on the wall over there, and it has an interesting spanking position. Of course it is meant to show you bound with your legs straight and your arms in a strappado natively, but what if I want MY ropes to do the job instead ? Let's find out how.
First I tie my legs in the "Tight" pose instead of "Hobble", for the sake of the demonstration, and I press
on both my arms and legs.
I activate the hook I hop to the poseball and I sit on it :

I look like I'm floating in the air, and my ropes are connected to the hook. Gracious, but... not really what I expected. Let's get on with that strappado already !
I click
and on the arms to move them almost all the way up, and then I press on the legs to move them all the way down. There ! Now I'm standing in a strappado !
I could also flex my legs a little, for example by clicking on
, and then once or twice :
It's all a matter of preference.
One last example ? Ok, a real quickie then. Did you notice that small cage earlier ? "serious small steel cage" by Vincent Weigler. I'll go curl down in it, and you'll see the ropes can withstand even that kind of situation.

This is the original position.
I click
on both the arms and the legs, I click on once for the legs and then on once and I'm curled up. All I need to do is to adjust my arms by clicking on once and that's it ! I might need to adjust my height a little with my Z slider, but nothing more.
If you wonder how to remember all those combinations to find the quickest route, don't worry, it comes naturally with a little practice.
I have shown you only the Hobble and Tight sits, but there are more. The Frogtie, for example, while simpler, is more flexible. One of its sits actually leaves the thighs free and only freezes the knees, so your upper legs still move in the position imposed by the furniture you sit on. This leaves you a lot of room for example for, umm, sex. The other sits in Frogtie allow you to curl in a ball but also to sit in scissors and such.
The ability of this Anim plugin to handle so many animations is the reason why the "on/off" and the "sit override" buttons have disappeared in this version. It had always bothered me that we were able to simply deactivate the current animation to be able to sit correctly, leaving the restraints in a strange state. Visible, but inactive. It looked weird and broke the mood. It was necessary though, because the older version did not have so many sitting animations, and its Autorefresh was simply broken so we needed a way to deactivate one restraint if we wore several restraints of the same type at the same time (like cuffs in a binder for example, or ankle cuffs with legs straps).
Now, with enough sitting animations to satisfy nearly all your needs and the Autorefresh feature being repaired, those buttons are not necessary anymore and are removed.
When you wear several restraints of the same type (several legs restraints or several arms restraints), a good idea is to turn Autorefresh off (on the main menu of the restraint, click on "More..." then "Autoref") on all the restraints of the same type but one. This prevents the restraints from fighting each other for the animations and for the movement. For example, you can wear both the legs straps and the Vixen legs cuffs, have the Vixen cuffs in "Taut" and the legs straps in "Hobble", but you want the Hobble to take priority. No problem, click on the Vixen legs cuffs and turn Autorefresh off. Now when you walk you will hobble and there will be no conflict.
Adjusting the height automatically
Another new feature for the plugin is its ability to automatically adjust your height, thanks to Henri Beauchamp's work on the "@adjustheight" command in the RLV some time ago. I am rather tall, and when I design animations I do it with my shape (I'm not only against alts, I'm also against changing shape all the time... what can I say), which means that if you are significantly smaller than me you will sink into the ground if you are in a hogtie, for example, unless you wear high heels. very, very high heels in some cases. Naturally, given the number of animations I cannot make several variations of the same animation depending on your shape. Some content creators do that, but I don't, too much work. There are over 300 animations in these ropes so I won't even consider that option.
The obvious solution is to let you tweak your height yourself thanks to your Z slider (many Third Party Viewers have one, including the RLV where it is directly at hand, but for some reason Firestorm does not, at the time of this writing), but that's tedious since you would have to do that every time you change your pose.
So the solution is to make the plugin tweak it for you automatically. It doesn't even require any input on your part. If the plugin detects you are using the RLV, and if the animation is meant to change your height, then it will adjust so you are as close to the ground as possible. It also takes the height of your shoes into account so high heels will not give the same offset than flatties. The offset also changes every time the animation changes, which means it changes when you start moving and changes back when you stop. Finally, it is set back to zero once you're untied or switch to an animation that does not trigger the automatic offset feature such as standing animations.
It works pretty well but is not perfect, and it is not meant to decide for you the height that you prefer. So you have a way to add a custom modifier yourself, that will be applied every time the plugin changes your offset.
Enough talk, let's illustrate :
I am currently in the "Tight" tie, standing, and my Z offset is zero.

Since I am standing, my height does not matter when it comes to making my feet touch the floor. SL calculates it automatically, so the Z offset can stay at zero (and will).
But what if I sat down ? Depending on my height, I would either sink into the ground or hover above it, but there is little chance I would be perfectly level. Well in my personal case, with my shape, I would, but only because this is the shape I used to make those animations in the first place. Anybody else would sink or hover, and that's where the auto adjust feature comes in handy.

To illustrate the height problem, I will now wear high heels without moving (the adjustment occurs only when the animation changes).

Since the plugin did not notice I changed height, and I am higher because of the heels, I am now floating in the air because my Z offset is still at zero. Let's move a little so the plugin notices the change and adjusts :

The plugin has corrected my height by -0.09 now. That's good, but not good enough to my taste because I'm still a little too high above the ground. Like I said above, the process is not perfect so it also takes your preference into account. Personally, I found out that I like it 0.05 to 0.07 units lower than zero, usually. To do that, I simply click on the "Offset" button of my Anim HUD :
 , and it gives me this menu :
This menu is quite simple. It lets you specify your modifier, save it in case you want to use another one for a bit, set it back to zero and also activate or deactivate the whole adjusting (because you might simply not want to let the plugin play with your Z offset at all, who knows). I set it to -0.05 :

Et voila ! Back on the floor ! Notice how the Z offset has changed now, taking my modifier into account : -0.14 is equal to the former -0.09 plus my modifier of -0.05.
To finish, you might have noticed that the HUD is surrounded by a darker area (it's faint, you may want to look at it over a light background). If you click on it, the HUD will get out of the view but a part of the dark area is still visible. Click on it again, and it comes back. Exactly like the Riding Reins HUD.
This pretty much covers it all. Sorry for the long winded tutorial but there was a LOT to explain.
Have fun !
Marine
PS : For this tutorial, I am wearing two outfits from Graves. The bottom is from the Bare outfit, the top is from the Resistance outfit. The heels and mesh feet are from Skifija.
Subscribe to:
Posts (Atom)

